This article features a guide for Administrators to tools applicable to all available channels (Chat, Email, SMS) of Talkdesk Digital Engagement™.
- Conversation Weight
- Configuring Templates
- Managing Templates
- Creating a Template
- Editing a Template
- Channels Active for the Template
- Deleting/Deactivating Templates
- Templates Integration with Knowledge Management
- Managing Sound Notifications
- Priority Configuration
- Conversation Timeout Configuration
- Conversation Reopening Configuration
- Wrap-up: Disposition Sets
- Digital Conversation Wrap-Up Settings
- [Preview] Co-browsing
- SLA Policies Configuration
- Available AppConnect Apps with Digital Engagement
- Roles and Permissions
Conversation Weight
This feature allows you to configure the weights of each conversation for each of the digital channels from one to 100 points. This configuration is set at the account level.
Agents have 100 points of capacity, which means the value for each conversation weight varies depending on the business needs. Each admin should try to understand which configuration makes more sense to support their specific use case.
To access the option for Conversation Weight, go to Admin [1], choose Channels [2] and then select the Global settings tab [3].
Click the Edit button [4] to enter Edit mode. Then, you will be able to:
-
Configure and “Define conversation weight” per channel (The range is from one to 100):
- Dragging each of the slides allows you to “Define each conversation weight” [5],
- Or by manually inputting the value in the text box [6].
-
Restore to default values:
- By channel, clicking on the restore button on each line [7].
- All channels, by clicking on the “Restore to default values” button [8].
Note:
The Default values are:
- SMS, Email → 5
- Chat → 30
- Facebook Messenger, WhatsApp and Digital Connect → 20
Inbox Pull Capacity Settings
- Include pulled conversations from Inbox in capacity calculation: This setting ensures that when an agent manually pulls a conversation from the inbox, it counts toward their overall capacity. Enabling this helps provide a more accurate view of agent workload and prevents agents from being overloaded with too many conversations.
-
Allow pulled conversations to exceed max capacity of 100 points: This option allows agents to pull conversations from the inbox even if doing so would exceed the default maximum capacity of 100 points. It offers flexibility in special cases where agents need to handle additional interactions beyond the standard limit.
When you’re done, click Save [9] to apply your choices.
These values are not retroactive, which means that once the settings are changed they will only be applicable to new conversations.
Example 1:
Assuming the configuration above, if an agent has already received 1 Voice, 1 Email, 1 FB and 1 SMS, (51+20+20+5 = 96 points) he/she won’t get any other conversation being pushed to him/her because there’s no space left to receive any other conversation (none conversation is configured to have four points or fewer).
Example 2:
Assuming the configuration above, If an agent has already received 1 Voice (51 points) he/she won’t get any other conversation being pushed to him/her because there’s no space left to receive any other conversation (none conversation is configured to have 49 points or fewer).
Supervisors will be able to monitor the occupancy of each of the agents in Live Reporting.
Nevertheless, the same agent is able to pull new conversations from the Inbox manually because the Conversations weight only applies to the Push model (conversations that reach the Agent through the “Assign Agents to Message” component in Studio).
Current Methods for Updating Agent Capacity and Occupancy
Studio Assignments
When the "Assign Agents to Message" component successfully assigns a conversation to an agent:
- Capacity Defined in the Component: The agent's occupancy is updated according to the defined value in the component.
- Capacity Not Defined in the Component: The occupancy is updated based on the global capacity setting.
Agent Transfer and Supervisor Transfer (Live Contact List)
When a conversation is transferred by an agent or a supervisor:
-
Deduction from Current Agent: The occupancy associated with the conversation is released from the original (handling) agent.
Note: Supervisors cannot assign the conversation if the receiving agent is already at full capacity. - Increase for Receiving Agent: The occupancy is applied to the receiving agent.
- Capacity Check: A conversation cannot be transferred to an agent without sufficient available capacity.
Supervisor Transfer (Live Unassigned List)
When a supervisor transfers a conversation from the live unassigned list:
-
Occupancy Increase: The receiving agent’s occupancy increases.
Note: Supervisors can assign the conversation even if the receiving agent is already at full capacity.
-
Applied Value:
- If the conversation had a component-defined capacity, that value is applied.
- Otherwise, the global capacity setting is used.
Sending Conversations to Inbox or Closing Conversations
When agents send conversations to the inbox or close them:
- Release of Occupied Capacity: The occupancy held by the conversation is released.
- Case Resolution (Email): Resolving a case associated with an email releases the occupied capacity for the assigned agent.
Scenarios That Do Not Impact Agent Capacity or Occupancy
Agents Assigning Conversations from Inbox
- By default, conversations pulled from the inbox do not consume agent capacity.
If the “Include pulled conversations from Inbox in capacity calculation” option is enabled, it will change the agent capacity. - This allows agents to manage urgent messages even when their capacity is fully utilized.
Case: Assign an Email to Me
- If the email was previously assigned to another agent: Reassigning it to yourself and replying will release the occupancy for the previous agent but will not consume your own capacity.
- If the email was unassigned: Assigning it to yourself does not impact your capacity.
Dedicated Routing (SMS Only)
- Conversations routed directly to an agent via dedicated routing do not affect their occupancy.
Conversation Reopen
- Reopened conversations do not occupy agent capacity.
- Canceling a reopen has no impact on occupancy.
Configuring Templates
To configure your templates and view the available collections, go to Admin [1], choose Channels [2] and then select Templates [3].
From the list, you can click the More Actions button (...) [4], to delete a collection. Simply choose Delete to remove the collection.
If no template collections have been created yet, press the + Create collection button [5].
This opens a new menu. Here, you must give your collection a “Title” [6] and define a “Language” [7] for the collection’s templates. Both these fields are mandatory.
Note: Once the collection has been created, its name cannot be changed.
Managing Templates
On the Templates menu, select a collection to view its templates.
The template listing features a “Channels” column [1] detailing which channels (“Email, “SMS” and/or “Chat”) that specific template is activated for.
Existing templates can be edited, deleted, or made inactive, by selecting the More Actions button (...) [2].
Notes:
- Inactive templates won’t be available for Agents.
- Deleted templates cannot be recovered.
Creating a Template
To create a new template, choose the + Create template button.
A new menu will pop up, where you will be prompted to give it a “Title” [3]. Filling this field is mandatory. Click Create [4].
Editing a Template
For each template, you can adjust the content for each of the available channels.
Note: To be active, the templates must have at least one channel active.
On email and digital connect channels, you can define rich text messages (including links). For the SMS and chat channels, only plain text messages are allowed.
The editing options are:
- Insert Inline image (Email): For email channel, you can click the button to insert the inline image by using local image or online resource
- Variables: You can insert variables into template messages by dragging and dropping. Alternatively, press the “Insert Variable” button and select from the dropdown list of variables.
- Labels: Labels are used to tag the content to be ready to be fetched by other AI applications, such as Copilot, making sure the content is consistent both for virtual and human agents.
Note: When adding/editing a template, the channels sections that are available will depend on the channels provisioned for that account. For example, if the account only has “SMS” active, only the “SMS” section will be available.
Queue Configuration
Admins can now restrict template usage to specific queues. Only agents who are members of selected queues will be allowed to use the template. When no queue is selected, the template will be available for all agents.
Templates Configuration - Managing Templates
Channels Active for the Template
After accessing Admin > Channels, you can see for which channels the template is activated.
Deleting/Deactivating Templates
You can edit (see the Editing Templates section below), delete, or deactivate templates at any time, by clicking the More Actions (...) button and selecting the desired option from the dropdown.
Important Notes:
- Deactivated templates will not be available for agents.
- Deleted templates will be permanently eliminated and cannot be recovered.
Templates Integration with Knowledge Management
Templates are stored on the Talkdesk Knowledge Management™ database. In case Knowledge Management is not available, the templates will not work.
Storage in the Knowledge Management system is done so that the AI engine and Talkdesk Digital Engagement™ feature the same data source. This will provide consistent answers, ensuring that virtual and human agents access the same information.
Note: To use templates, the Knowledge Management app needs to be installed.
To grant permissions in Knowledge Management, go to Admin > Roles and Permission > Knowledge Management.
Notes:
- New roles are required to have the “Create”, “Publish” and “Delete” permissions to Card to be able to manage templates under the Channels app.
- To know more about how to grant permissions to certain roles or users in Knowledge Management, please refer to this article.
Managing Sound Notifications
To access the option for Conversation Sound Configuration, go to Admin [1], choose Channels [2], and then select the Global settings tab [3].
Click the Edit button [4] to enter Edit mode. Then, you will be able to configure the following audio notifications for the following events:
- “Inbound conversation offered”
- “Auto-assigned conversation”
- “Transferred conversation”
- “New reply to ongoing conversation”
You will be able to select and hear different sounds when the above events happen, based on settings defined by the account’s administrators. Press Save to apply your options.
To configure the sound output device, go to Conversation Settings > Audio Settings > “Ringing output”.
Sound Configuration: Default Options
| Events | Event Scope | Available Sound Options | Default Options |
| Inbound conversation offered | Triggered by the Talkdesk Studio “Assign Agents to Message” component, by using the “Manual accept” option in the “Offer type” section. |
|
Bubbles |
| Auto-assigned conversation | Triggered by the Talkdesk Studio “Assign Agents to Message” component, by using the “Auto accept” option in the “Offer type” section. | No sound | |
| Transferred conversation | Triggered by the agent's 'Transfer' action on Conversations and the supervisor’s 'Transfer' action on Talkdesk Live reporting. | No sound | |
| New reply to ongoing conversation | Triggered by a new reply message (from the contact person) to one of the conversations currently assigned to the agent. | No sound |
Priority Configuration
Agents handling multiple conversations need to be able to prioritize their work according to the level of importance that admins attribute to each conversation.
The “Inbox” app’s priority level enables agents to manage the inbox by first addressing the most urgent conversations, which benefits agent productivity.
Using the View Mode
To configure priority indicators, go to Admin > Channels > Global settings > “Priority” [1]. By using the view mode, you can see the indicators configured for each priority level. Then, click the Edit [2] button to change the configuration.
Using the Edit Mode
Within the “Edit” mode, you can adjust the “Numbers” and the “Icons” displayed for each priority setting [1]. Click the restore button [2] to revert to the default values. Select the Save button to apply your changes [3].
Priority Configuration: Studio Component
To set up the priority value for agents, the following Talkdesk Studio™ components must be used:
- “Assign agents to message” component: Use the “Priority” scale (1-10) to determine the priority.
- “Send to inbox” component: Use the “Priority” scale (1-10) to determine the priority.
For additional information on Talkdesk Studio and how to use it, please read our Talkdesk Studio documentation.
Conversation Timeouts Configuration
To configure the conversation timeouts rule, go to Admin > Channels > Global settings > “Conversation timeouts”.
Here, you’ll be able to see the rules that are presently configured for each of the channels.
To access Edit mode and make changes to the configuration, scroll to the “Conversations timeouts” section and click the Edit button [1].
On this tab, you will be able to see all the rules, along with the trigger and the actions associated with it.
Click Create rule [2] to make changes to the configuration.
Conversation Status: Assigned to an agent
Allows admins to define automated rules for conversations that are assigned to an agent but show no activity. Rules can be set by specifying the trigger, action, and applied channels.
Trigger:
-
‘there’s no activity’
- Occurs when neither the agent nor the contact is active in the conversation.
Actions:
-
‘send conversation to inbox’
- When the trigger condition is met, the conversation is automatically moved to the inbox.
-
‘send conversation to studio flow’
-
When the trigger condition is met, the conversation is routed to a Studio Flow configured by the admin in Global settings | Transfer destinations
-
When the trigger condition is met, the conversation is routed to a Studio Flow configured by the admin in Global settings | Transfer destinations
Set up the rule by defining the trigger, action, and channels that it should be applied to.
Conversation timeout (agent): When the agent is actively working on that conversation, a pop-up window will appear if the send to inbox action is triggered.
Conversation Status: In the inbox
Allows admins to define automated rules for conversations that are in the inbox. Rules can be set by specifying the trigger, action, and applied channels.
Trigger:
- ‘remains unassigned’
- When conversations are in the inbox and in unassigned status.
Actions:
- ‘close conversation’
- When the trigger condition is met, the system automatically closes the conversation.
- ‘send conversation to studio flow’
- When the trigger condition is met, the conversation is routed to a Studio Flow configured by the admin in Global settings | Transfer destinations
Note: For each channel and each condition type (e.g., "in the inbox", "assigned to an agent"), only one active rule can exist.
Wrap-up: Disposition Sets
Configuring a Disposition Set
To configure the disposition set or disposition, go to Talkdesk Workspace > Admin [1] > Dispositions [2].
Creating a New Disposition Set
Click on the Create set button [1], to access the tab and fill in the set’s information.
After giving your set a name, indicating the “Call direction” and selecting the appropriate “Ring groups”, click on the Dispositions tab [2].
Use the Add dispositions button [3] to choose which dispositions should be under this set.
Creating a New Disposition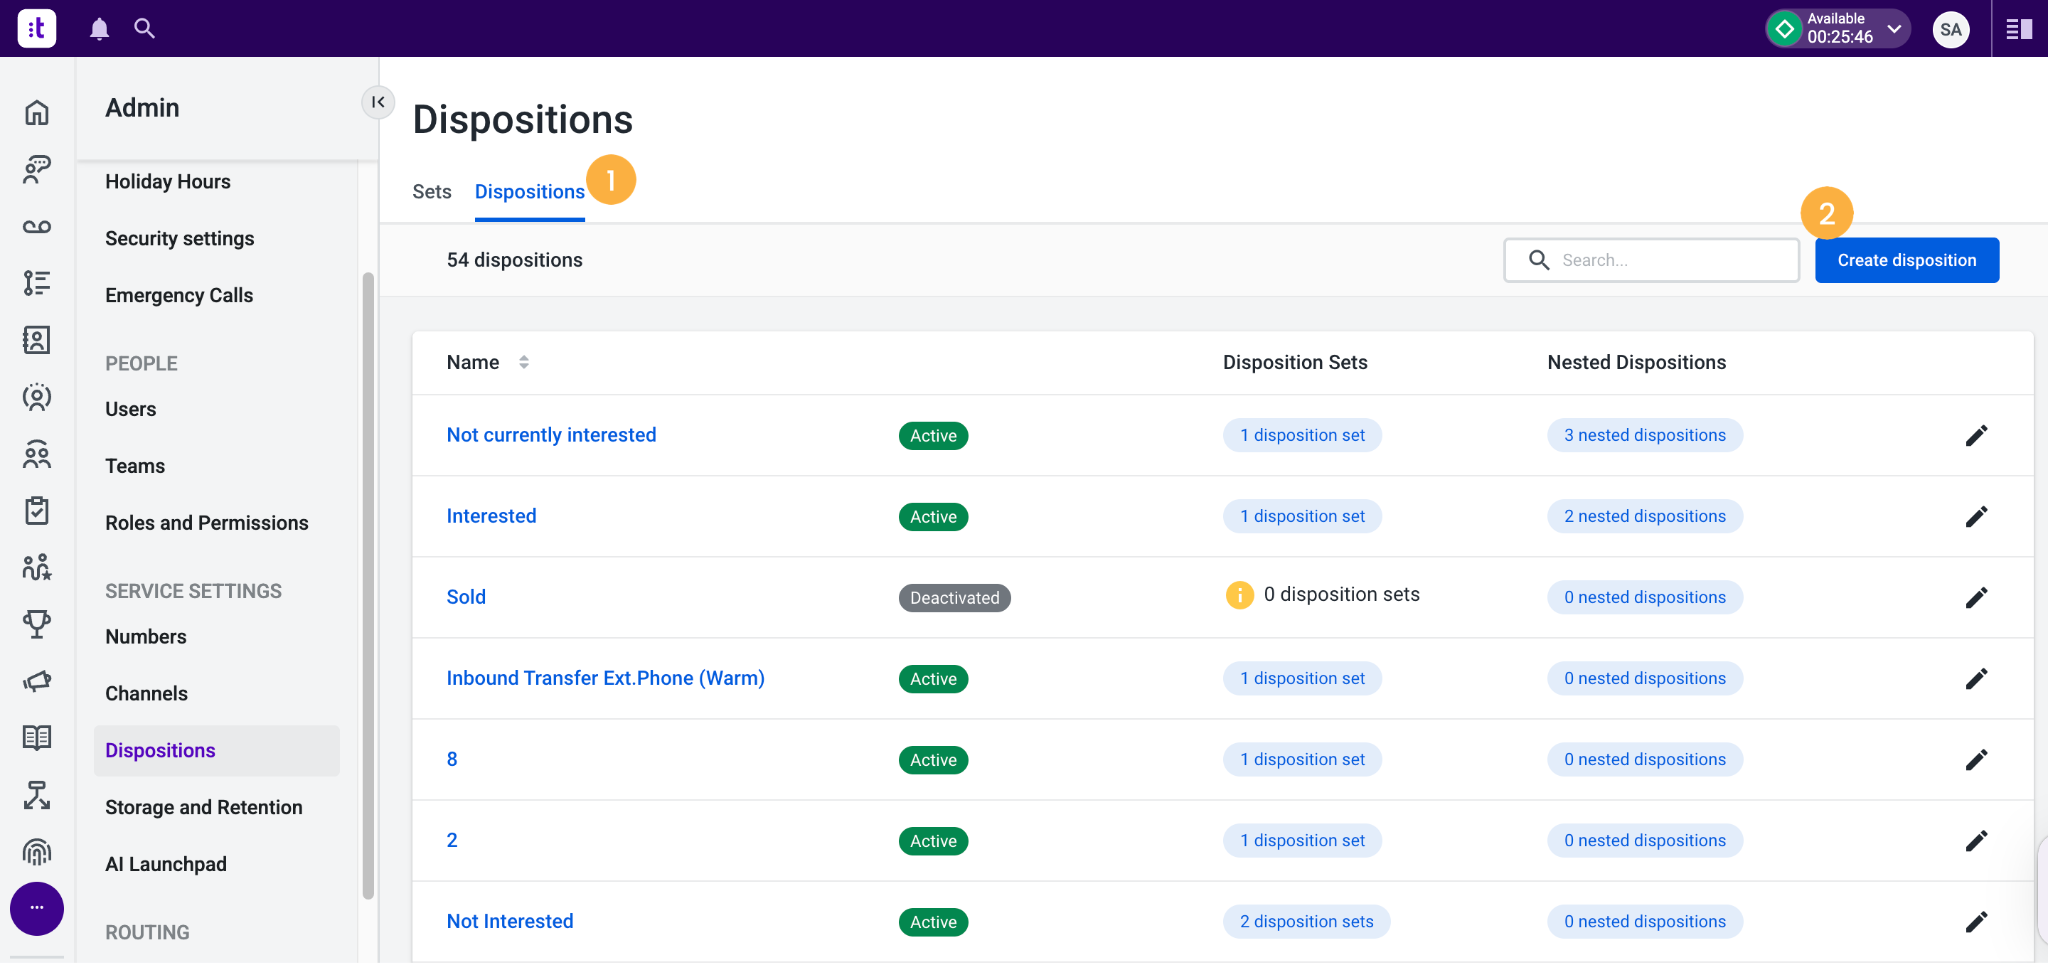
On the Dispositions tab [1], click on the Create disposition button [2].
A “Disposition settings” tab opens, where you can fill in the disposition’s information: “Name” [3] and activate/deactivate it, by pressing the toggle [4].
Conversation Reopening Configuration
To configure the reopening rules, go to Admin > Channels > Global settings > “Conversation reopening”. In the read-only mode, you can see the conversation reopening rules configured for each channel. Click the Edit button [1] in “Conversation reopening” to be able to edit the rules.
Note: By default, the rules for each channel are deactivated, e.g. for the Email channel [2].
Note: As shown in the message at the top of the menu [3], conversations that are reopened will be automatically assigned to the last agent that handled this conversation.
Use the toggle [4] to activate or deactivate the rules for each channel. Active rules will be triggered to reopen closed conversations when the listed conditions are met. Inactive rules won’t be triggered to reopen any conversations.
Only when the listed conditions for a channel are all met [5] will the active reopening rule be triggered to open that channel's closed conversations.
You can also set up the maximum time duration of the last message [6]. If the last inbound/outbound message was received/sent before the configured time, the reopening rule will not be triggered.
Digital Conversation Wrap-Up Settings
What is Digital Wrap-Up?
The Digital Wrap-Up stage allows Agents to complete any final tasks after handling a digital interaction. During this stage, the Agent’s status remains unchanged, but the conversation will continue to occupy their capacity, until the Agent either submits or dismisses the wrap-up form.
Agents can use this stage to log important information, such as:
- Dispositions
- Notes
- Contact details
Configuring Digital Wrap-Up
- In the Admin application, go to Agents.
- Select the desired agent.
- Open Wrap-up Settings.
- In the Digital conversation wrap-up settings section, click Edit.
Wrap-Up Options
Wrap-up for Inbound Digital Conversations
Enable this option to allow Agents to enter the wrap-up stage after handling inbound digital conversations.
Use the toggle to manage whether the option is: Active or Inactive.
Timeout
When the wrap-up stage is enabled, you can also configure a timeout period, in the "Timeout" toggle. Use the toggle to manage whether the option is: Active or Inactive.
Note: In the "Duration" option, the minimum value is 5 seconds, while the maximum value is 12 hours.
Once the configured time elapses, the conversation will automatically exit the wrap-up stage, if the Agent has not completed it.
Disabling the Option to Dismiss the Wrap-Up Form
If selected, the Agent will not be able to dismiss the wrap-up form and must fill it out before ending the conversation.
Notes:
- The wrap-up form will not be saved if it times out.
- The conversation still occupies the agent’s capacity until the wrap-up form is either submitted or dismissed.
[Preview] Co-browsing
Note: This feature is available in preview for select customers.
This section covers how to configure the Co-browsing feature for cross-channel support. Co-browsing enables agents to provide real-time visual guidance to customers across voice and digital channels, streamlining issue resolution and improving customer experience.
Enabling or Disabling Co-browsing
Co-browsing is configured at the individual channel level, allowing administrators to enable or disable the feature selectively based on your team's needs.
To configure Co-browsing status:
- Navigate to Talkdesk Workspace > Admin > Channels
-
Select the channel you want to configure Co-browsing for
- Go to the Settings tab
- Locate the Co-browsing section and click edit to toggle the feature On or Off
- Once enabled, the detailed invitation configuration options will appear below the toggle
- Click Save to apply your changes
Configuring Invitation Methods and Templates
When Co-browsing is enabled, administrators can define how agents send session invitations to customers and customize the invitation content for each channel and delivery method.
Supported Invitation Methods by Channel
The table below outlines the available invitation delivery methods for each supported channel, along with the recommended approach for optimal customer experience:
| Channel | Available Invitation Methods | Recommended invitation method |
| Voice | SMS, Email | - |
| SMS, Email | ||
| SMS | SMS, Email | SMS |
| Chat | SMS, Email, In-App Chat | In-App Chat |
| SMS, Email, WhatsApp |
Invitation Delivery Details
- SMS Invitations: Invitations are sent from phone numbers configured in your SMS Sender Numbers List. Only numbers enabled for Automated Notification SMS delivery will appear in the option list
- Email Invitations: Invitations are sent from email addresses configured in your Email Sender List. Only email touchpoints set to the "Notification" type will appear in the option list.
- Chat/WhatsApp Invitations: Invitations will be sent directly within the active conversation thread; no additional sender configuration is required
Customizing Invitation Templates
Administrators can create and customize unique invitation templates for each combination of channel and delivery method. This allows you to align invitation messaging with your brand voice and provide clear, context-specific instructions for customers joining co-browsing sessions.
SLA Policies Configuration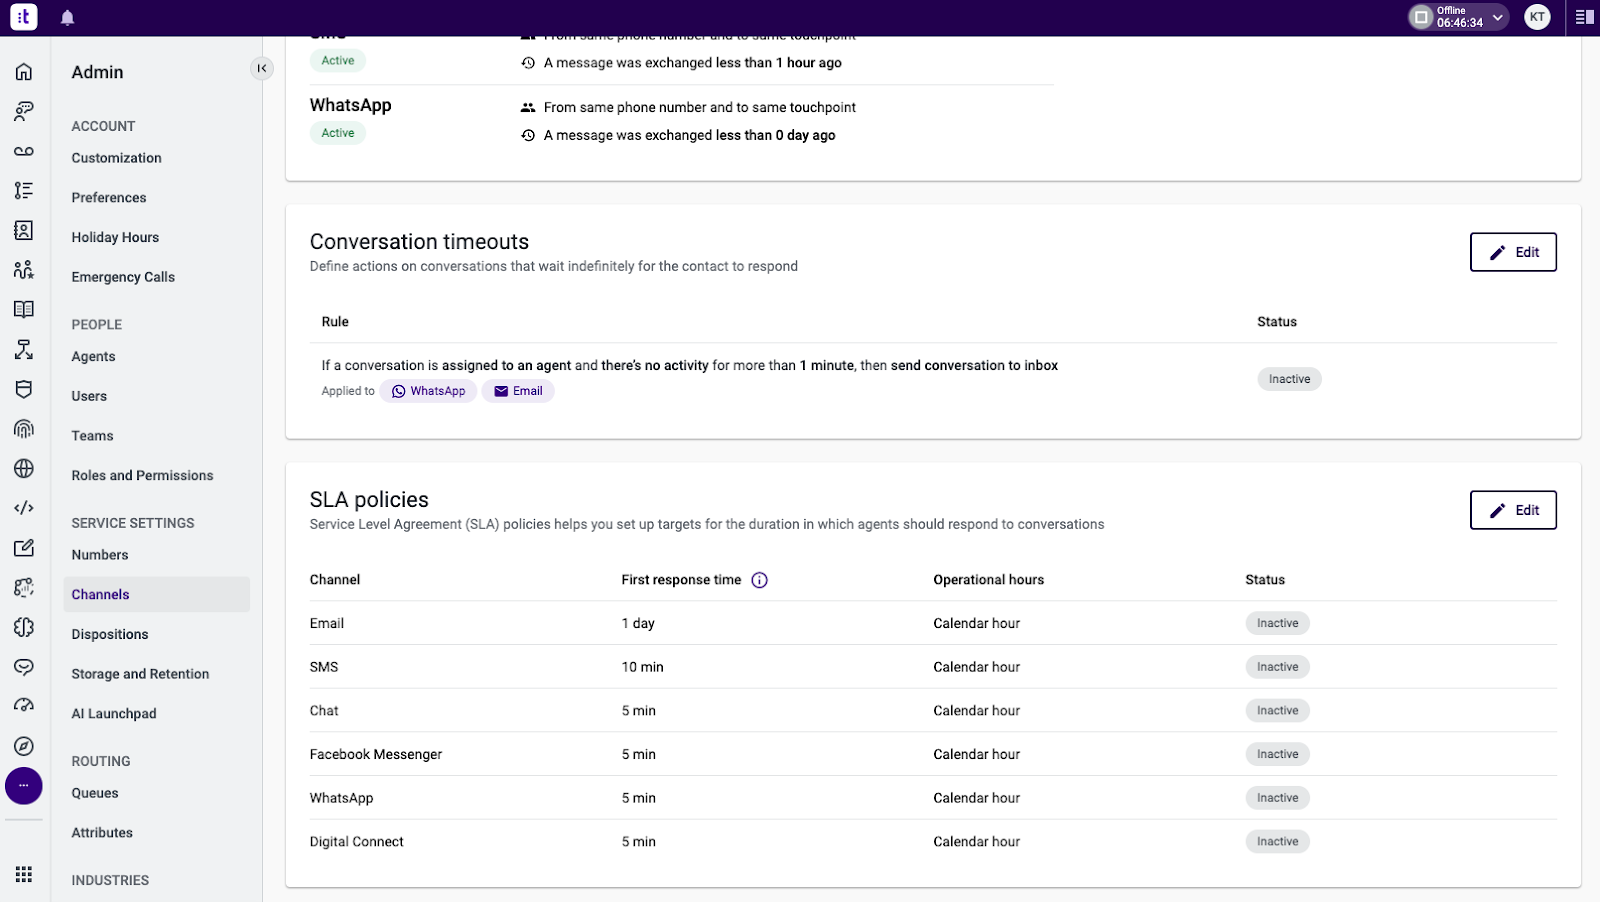
To begin configuring your policies, go to:
- Admin > Channels > Global settings > scroll to the “SLA Policies” section > click the Edit button.
Note: Keep in mind that SLA policies for each channel are deactivated by default. Before clicking the Edit button (within read-only mode), you can see the SLA policy configured for each channel.
Operational Hours
SLA policies are running on calendar hours, including after-work hours, weekends and holidays.
Time Threshold
You can set up the expected time threshold for first response time of inbound conversations of each channel.
For example, if you expect your agents to send the first reply to your customer’s emails within 36 hours, you can set the time threshold to 1 day and 12 hours for the Email channels.
Note: SLA policies of First Response Time will only be applied to inbound conversations. SLA policies of First Response Time will not be applied to outbound conversations.
Activating/Deactivating SLA policies
SLA policies for each channel can be activated/deactivated at any time.
- Active SLA policies: Will be applied to inbound conversations that are created or escalated to agents after the activation.
- Inactive SLA policies: Won’t be applied by inbound conversations that are created or escalated to agents after the deactivation.
If there is autopilot (virtual agent) engagement in inbound conversations, active SLA policies will be applied when the conversation is escalated to agents, instead of when the conversation is created.
Once you're done, click the Save button to finalize and activate your changes.
Available AppConnect Apps with Digital Engagement
The table below displays the list of the AppConnect Applications that are currently available with Talkdesk Digital Engagement.
| App | Purpose | Recommended Roles |
| Channels App | Manage channel settings and configurations | Administrator |
| Inbox App | Access to Inbox/Queue | Agents |
| Conversation History App | Access conversation details | Supervisors |
| Email App | Access to Email channel | Agents, Supervisors |
| SMS App | Access to SMS channel | Agents, Supervisors |
| Chat App | Access to Chat channel | Agents, Supervisors |
| Facebook Messenger App | Access to Facebook Messenger channel | Agents, Supervisors |
For more context and information on how to install AppConnect Applications, please refer to our Knowledge Base article on Installing and Uninstalling AppConnect Applications. For information on how to edit each role’s permissions, please check this article.
Roles and Permissions
Inbox: Transfer and Close permissions
The Digital Permissions section in Talkdesk Roles and Permissions enables admins to manage how users interact with the digital feature. By assigning permissions across roles, you can control who can transfer or close digital interactions.
Note: For more details about Talkdesk Roles and Permissions and Teams and structure, refer to Talkdesk Roles and Permissions
Transfer
Allows the user to transfer a digital conversation to the Inbox of the Talkdesk Conversations App.
Close
Allows the user to bulk close digital conversations in the Inbox of the Talkdesk Conversations App.