Digital Connect is an API solution that allows you to utilize all the features of Talkdesk, while maintaining your own customer interface. With Digital Connect, you can transfer conversations between your brand's interface and Talkdesk, thus improving interactions with your customers.
Among the features you can utilize with Digital Connect are:
- Agent experience
- Unified reporting
- Configurable routing
- Automations
- Others
Article Index
- Connecting Non-Talkdesk Digital Message Channels to Digital Connect
- Installing Talkdesk Digital Connect
- Configuring Digital Connect
- Creating a New OAuth Client
- Configuring a Touchpoint
- Creating a New Touchpoint
- Touchpoint Tab
- Features Exclusive to Digital Connect
- 3rd Party Context Variables: Bringing and Previewing the Variables
- Rich Text Formatting
- Additional Information
- Download Input Schemas
Connecting Non-Talkdesk Digital Message Channels to Digital Connect
Digital Connect enables you to utilize a digital messaging channel that isn't natively supported by Talkdesk.
To integrate an unsupported channel with Talkdesk, you'll need to develop and host your own middleware software.
- This middleware serves as a bridge or adapter between the channel and the Talkdesk Platform, facilitating communication by translating between potentially incompatible API specifications. Various interactions will then be enabled, such as agents sending messages to contacts, to occur seamlessly.
How to Connect an External Digital Message Channel
When a contact person initiates a conversation with an agent (Inbound Conversation), the middleware should invoke the Start a Conversation API. Upon successful invocation, the API will return a conversation ID. Subsequently, when the agent initiates a conversation, it will trigger the webhook messaging (conversation_started), and the middleware should retain the conversation ID.
If the contact person wishes to send a message, the middleware should utilize the Send a Message API with the conversation ID. Upon the agent's reply, which triggers the message_created webhook messaging, the middleware should handle the webhook messaging and relay updates to the contact person. When the contact person decides to end the conversation, the middleware should invoke the End a Conversation API. Conversely, if the agents end the conversation, it will trigger the conversation_ended webhook messaging.
Example of an Events and Message Flow (Inbound Messaging)
Example of an Events and Message Flow (Outbound Messaging)
Notes:
- All the activities between the external system and Talkdesk ID/Digital Connect must be achieved by the respective middleware.
- For the outbound messaging scenario, authentication is optional depending on the request from the external system.
Technical Requirements
-
Talkdesk APIs: Authenticate with Talkdesk APIs for handling inbound communication
-
- Authentication = Oauth2 Client Credentials.
- API Documentation - Link to API Documentation
-
-
Web Service - Endpoint to receive Talkdesk Webhook messaging for Outbound communication.
-
- Authentication: Link to supported authentication
- Webhook messaging: Link to message schema
- Endpoint Best practices: (30-second timeout. Asynchronous processes recommended).
-
-
Store Touchpoint ID: One or many touch points needs to be stored by the Customer application. Any new conversation needs to reference the static ID.
-
- If multiple touchpoints are required, (for multiple subjects). Then a mapping of touchpoints will need to be stored. (Recommend we use only one touchpoint).
-
-
Monitor/store the state of a conversation (Open/Closed): Conversations can be opened by both parties and closed by agents. The customer application needs to track the state of a conversation to understand if messages will be appended to open conversations, or if a new conversation needs to be opened first. The following events must be stored:
-
- POST /conversations > response will be conversation ID
- Webhook: Conversation_created
- Webhook: Conversation_ended
-
Installing Talkdesk Digital Connect
Follow the steps below to enable Digital Connect:
- After purchasing Digital Connect via your Talkdesk representative, install the Digital Connect app through the Atlas Apps Marketplace.
- Log in to the account you want the channels provisioned
- Choose the plan, the users you wish to add, and select the auto-installation option
Configuring Digital Connect
To use the Digital Connect API, clients need to configure the following settings:
Install the required apps:
To access the Talkdesk APIs, create a New OAuth Client and add the following scopes:
- digital-connect:read
- digital-connect:write
- Attachments:read (Optional)
- Attachments:write (Optional)
- Attachments:request (Optional)
- attachments:download (Optional)
Creating a New OAuth Client
Once Digital Connect is provisioned in your account, you can create a new OAuth client using Talkdesk Builder, with the scopes digital-connect:read and digital-connect:write.
Note: To enable attachments for digital connect, the scopes attachments:read, attachments:write, attachments:request and attachments:download are also required. To obtain access to the attachment API, please reach out to your Talkdesk representative.
In order to create a new OAuth Client, please follow the steps shown in this article.
Configuring the Connection with the 3rd Party
Set up Talkdesk Connections for the account to notify 3rd-party systems about lifecycle events.
Note: To start using Digital Connect API, Talkdesk Connections should be set up in place for the account. For more information, please see the article Configuring Connections for Digital Connect.
To configure the connection to a 3rd party, please access Talkdesk Builder > "Integrations" tab.
Select the type of channel you wish to send your notifications over from the “My Integrations”.
Note: You can also configure other channels by clicking on the Add button of each integration, in the "Browse Integrations" tab.
A list of possible integrations will show up. Search for “Custom integration: Powered by Connections”. Click Add integration to proceed.
In this page, you will be prompted to fill out the following fields:
- “Name”: What you wish to name the connection.
- “Description”: Detail what the connection does.
- “Base Path”: The base domain of the 3rd Party’s webhook.
- “Authentication type”: The Authentication to be used.
- “Add header”: Use this button to add extra headers, if required by the 3rd party integration.
After filling out the information, click the Save button to see automations, actions and settings.
Note: In the context of Digital Connect we will only work with actions.
For more details, check this Knowledge Base article on Creating a Connection with Talkdesk Connections.
Adding New Actions
Actions are the entities that perform requests to the 3rd Party. Digital Connect has three Lifecycle Events that need to be propagated to the 3rd Party. So, three new actions need to be created.
Note: The actions MUST have the same name as the Lifecycle Event counterpart (conversation_started, conversation_ended, message_created).
After creating the Integration, head to the “Actions” > “Add action”. Note: You will have to do this three times - one per each event.
This page will prompt you to complete the following fields:
- “Name”: Add the name of the action. It is mandatory that It must be the same as the name of the lifecycle event that it represents (conversation_started, conversation_ended or message_created).
- “Description”: Explain what the action does.
- “URL settings”: The relative path having the connection base domain as its prefix. The result will be base domain + relative path. Note: The action needs to also be a post request.
Input Schema
The Input Schema (a JSON schema) is where it is defined what Talkdesk will send to the 3rd Party webhook. The schema is where the actions will differ in the context of Digital Connect, as each lifecycle event has different data. You can find the schema for each event below. Just copy and paste them into the Input Schema and save in the correct action.
Please copy and paste the schema you require into the schema box. Be sure that you use the one corresponding to the action that you are configuring. The schemas are available in the downloadable PDF file at the bottom section of this article.
Note: Before proceeding, make sure that all actions are activated.
Example
In the image above, you can see an example of how your actions should show up at the end: You should have 3 actions with the same names as in the screenshot and with the “Active” status.
Configuring a Touchpoint
Access the Channels section and click on the Digital Connect section to configure it. You can also see the number of touchpoints that were already configured for Digital Connect.
When clicking on the Digital Connect channel, you will be redirected to the list of all touchpoints that are configured for your account.
The Digital Connect channel tab also contains the following information:
- Total number of touchpoints configured.
- “Friendly name” of the touchpoint.
- “Status” of the touchpoint. When active, the touchpoint can create and/or receive conversations.
- “Routing” type selected for each touchpoint.
- The “Assigned to” column shows to whom the touchpoint is assigned.
If you click on any touchpoint’s More actions (...) button, you will be able to either:
- Edit: It will send you to the touchpoint details where you can change the configuration
- Duplicate: Duplicate an existing touchpoint
- Deactivate: Ability to activate or deactivate a touchpoint
- Delete: This option is only possible if the touchpoint is deactivated first. Make sure to close all ongoing conversations on the touchpoint that you want to delete.
Creating a New Touchpoint
Inside the Digital Connect channel’s tab, use the Create touchpoint button to create a new touchpoint.
A pop-up will appear, prompting you to indicate a connection (use the one configured in this section) and a friendly name for the touchpoint. Press Create to finalize the process. Note: “Connection” is a mandatory field.
Touchpoint Tab
Use the touchpoint tab to change the touchpoint’s Connection, Status and Routing Type
This tab features the following fields:
- “Friendly name” [1] of the touchpoint (also visible by the agent).
- “Connection” [2]: Dropdown with list of existing connections (we recommend using the one configured in this section).
- “Status” [3]: Use this toggle to activate or deactivate the touchpoint. When active, the touchpoint can create or receive conversations.
- “Conversation subject” [4]: Toggle to activate or deactivate the conversation subject. When active, conversations on this touchpoint can have a subject.
- “Routing Information” [5]: Routing type selected for each touchpoint. When selecting the connected Studio flow, a list of existing Incoming Message flows will appear, as well as a link to configure a Studio flow.
Notes:
- When selecting “Simplified Routing” in the “Routing type” dropdown, you can select a list of Queues that will receive Digital Connect conversations.
- When using the Push model in Studio, each Digital Connect conversation will have for now the default weight of 20/100 points of capacity.
- The arguments on the initial step can also be used on Digital Connect to pass additional context coming from the 3rd party solution.
To start your first Digital Connect conversation, follow the Digital Connect API doc. You can also use the Attachments API to upload and download attachments through Digital Connect.
Features Exclusive to Digital Connect
Optional conversation subject
Admins can choose to enable/disable the conversation subject for Digital Connect touchpoints.
Configuring Attachments
Admins can modify the touchpoint’s attachment settings, to comply with 3rd party requirements and mitigate security risks.
When admins are editing a touchpoint, the “Attachments” section allows using the toggle [1] to determine whether agents are allowed to send attachments or not. Note: Agents will always receive attachments if they conform to the permitted attachment size and type.
The maximum size of attachments, for inbound and outbound conversations, can also be determined in this menu [2].
- Agents will not be able to send attachments that exceed the specified size limitation.
- If a 3rd party attempts to send attachments that surpasses the size limitation, the agent will be notified, and the attachment will not be downloadable.
- The maximum configurable size for attachments is 30 MB.
The accepted attachment formats (for both inbound and outbound communications), may also be determined by Admins [3].
- Agents will not be able to send attachments in formats that are not allowed.
- If a 3rd party attempts to send an attachment in a non-permitted format, the agent will be notified and the attachment will not be downloadable.
For more information on how to use attachments, please see this article.
3rd Party Context Variables: Bringing and Previewing the Variables
Admins can leverage the Digital Connect API and Studio flow to send the context parameters from the 3rd party to Agent Workspace.
Viewing Previous messages from the Contact Person
When a new conversation arrives from an external bot, agents will be able to view all the messages previously sent by the contact person in the Conversations app.
Rich Text Formatting
To enable rich text formatting for agents to use and render rich text messages, follow these steps:
- Access the digital connect touchpoint settings from your administrative dashboard.
- Locate the "Rich Text Formatting" option.
- Toggle the switch to enable the feature.
Important Note: The formatting of messages received prior to enabling or disabling the rich text formatting feature will remain unchanged and will be preserved as per the setting when the messages were originally received. For example:
- If the rich text formatting feature is enabled, and a message with rich text formatting is received by the agent, that message will be displayed with all the formatting elements intact, even if the rich text feature is disabled at a later time.
- Conversely, if the rich text formatting feature is disabled, and a pure text message is received, that message will continue to appear as plain text, even if the rich text feature is enabled subsequently.
Disabling Rich Text Formatting
To revert to the default settings and disable the rich text formatting feature, follow these steps:
- Access the digital connect touchpoint settings from your administrative dashboard.
- Locate the "Rich Text Formatting" option.
- Toggle the switch to disable the feature.
By disabling the rich text formatting option, agents and contact persons will only be able to send and receive pure text messages, providing a more straightforward messaging experience similar to traditional text-based communication.
Example of a Message in Rich Text Format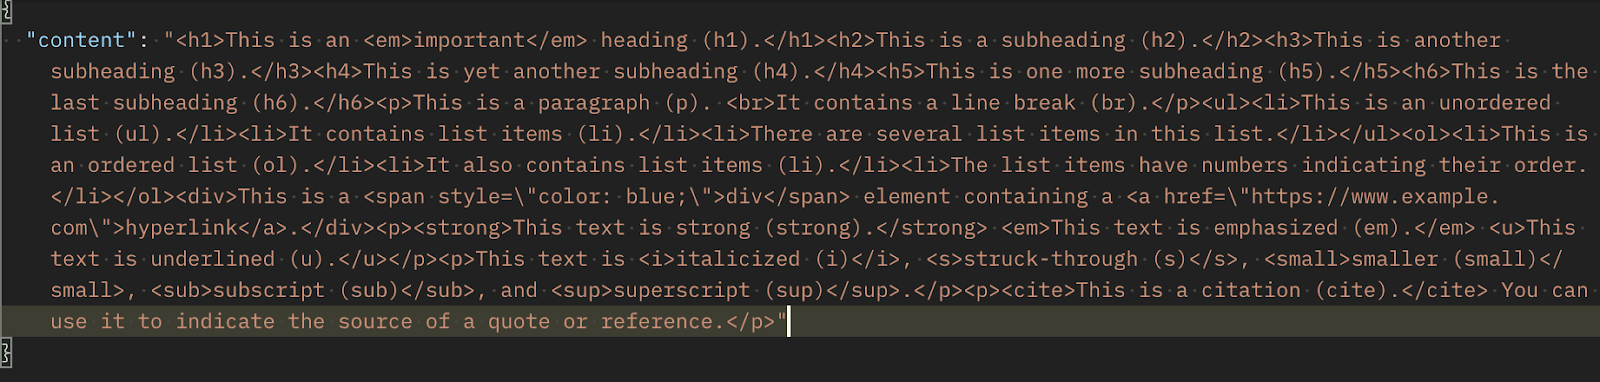
Rich Text Formatting Limitations
The VA Agent's Processing Limitation
The Virtual Assistant (VA) agent may face challenges processing digital connect conversations that contain highly complicated HTML elements. In such cases, the VA agent might not be able to interpret the rich text elements correctly, leading to potential inconsistencies in its responses. Users are advised to test their digital connect messages with the VA agent to ensure optimal processing.
Digital Connect Templates and Incompatible Touchpoints
If a digital connect template is constructed using rich text format, it is crucial to consider the compatibility of the touchpoints used for communication. If a particular touchpoint does not support rich text format, and an agent selects an rich text format template while communicating with a contact person through that touchpoint, the template will be automatically transformed into pure text format. Users are recommended to verify the supported features of their touchpoints before selecting rich text format templates to avoid any unintended transformations.
Supported Rich Text Formatting Tags in the Agent’s Text Editor
In the agent’s text editor, the following HTML-like tags can be used to apply formatting to messages:
- “<a>”: Creates a hyperlink. Agents can use this tag to link to external URLs or other resources.
- “<b>”: Represents bold text. Enclosing text within this tag will make it appear bold.
- “<br>”: Inserts a line break. Using this tag, agents can start a new line within their messages.
- “<div>”: Defines a division or section within the text. It is useful for organizing content.
- “<em>”: Indicates emphasized text. Content enclosed within this tag will appear in italics.
- “<h1>”, “<h2>”: These represent heading elements. Agents can use these tags to create section headings with varying levels of importance.
- “<i>”: Represents italicized text. Text enclosed in this tag will be displayed in italics.
- “<li>”: Denotes a list item. This tag is used within ordered (`<ol>`) or unordered (`<ul>`) lists.
- “<ol>”: Creates an ordered list. Agents can use this tag to create numbered lists.
- “<span>”: Defines a span of text within the message. It can be used for styling a specific portion of the text separately.
- “<strong>”: Represents strong importance. Content enclosed within this tag will appear in bold.
- “<u>”: Underlines text. Enclosing text within this tag will add an underline to it.
- “<ul>”: Creates an unordered list. Agents can use this tag to create bullet-pointed lists.
Supported Rich Text Formatting Tags in the Conversations App
The Conversations app supports the following HTML-like tags for rendering in messages for both agents and contact persons:
- “<a>”: Creates a hyperlink. Links to external URLs or other resources can be created using this tag.
- “<b>”: Represents bold text. Enclosing text within this tag will make it appear bold.
- “<br>”: Inserts a line break. Using this tag, agents can start a new line within their messages.
- “<cite>”: Represents a citation or reference to a source. It can be used to highlight the source of information.
- “<div>”: Defines a division or section within the text. It is useful for organizing content.
- “<em>”: Indicates emphasized text. Content enclosed within this tag will appear in italics.
- “<h1>”, “<h2>”, “<h3>”, “<h4>”, “<h5>”, “<h6>”: These represent heading elements with varying levels of importance. Agents can use these tags to create section headings.
- “<i>”: Represents italicized text. Text enclosed in this tag will be displayed in italics.
- “<li>”: Denotes a list item. This tag is used within ordered (`<ol>`) or unordered (`<ul>`) lists.
- “<ol>”: Creates an ordered list. Agents can use this tag to create numbered lists.
- “<p>”: Represents a paragraph. It is used to structure the content into separate paragraphs.
- “<s>”: Represents strikethrough text. Content enclosed within this tag will appear with a line through it.
- “<small>”: Represents smaller text. It is used for content that should be displayed in a smaller font size.
- “<span>”: Defines a span of text within the message. It can be used for styling a specific portion of the text separately.
- “<strike>”: Represents strikethrough text. This tag is used similarly to `<s>` to apply a line through the text.
- “<strong>”: Represents strong importance. Content enclosed within this tag will appear in bold.
- “<sub>”: Represents subscript text. Enclosed text will appear slightly below the normal line.
- “<sup>”: Represents superscript text. Enclosed text will appear slightly above the normal line.
- “<u>”: Underlines text. Enclosing text within this tag will add an underline to it.
- “<ul>”: Creates an unordered list. Agents can use this tag to create bullet-pointed lists.
Additional Information
For more information on Digital Connect and how to obtain it, please see this section of the Digital Engagement FAQ.
Download Input Schemas