The Roles and Permissions section in Talkdesk offers advanced control over user access and allows administrators to manage teams effectively. In this section, Administrators can specify unique Talkdesk settings for each role and assign agents to specific roles.
To know more about Talkdesk permission roles for each product, please read this article on Roles and Permissions by Product.
When a Talkdesk account is created, the following default roles are automatically created:
- Administrator:
-
Supervisor:
- View access to the Supervisor Dashboard, including Admin, Teams, Reporting, and AppConnect;
- Cannot edit preferences or configure settings.
- This default role cannot be renamed, deactivated, or modified. Users with the default Supervisor role cannot edit preferences or configure settings and have view access to the "Supervisor Dashboard", which includes Teams, Reporting, Admin, and AppConnect.
-
Agent:
- Essential functionality access; cannot edit Preferences, configure settings, or view advanced reports.
- This default role cannot be renamed, deactivated, or modified. The “Agent” default role is preconfigured not to be able to edit Preferences, configure settings, or view advanced reports.
Before learning how to configure Roles and Permissions, let’s get to know the main concepts of this area:
Role: The identifier of an aggregation of permissions that defines the applications and data users can access in Talkdesk.
- Application [1]: A set of functionalities that serves a specific purpose – business domain.
- Area [2]: Represents a group of functionalities within an application area (e.g., Activities, Admin, CXA Operations Center (formerly AI Trainer), AppConnect, Studio, among others) upon which permissions are taken.
- Section [3]: A way to group areas that manage more than one function or resource within the same context (e.g., Billing, Dispositions, and Integrations within the Admin app)
- Permission [4]: A specific action that determines a capability within the application.
- Scope [5]: A data segregation mechanism that defines and restricts user access to specific features, data, or actions within the platform based on assigned roles and permissions.
These elements can appear in different configurations depending on which Talkdesk app you’re setting permissions for, but they mean the same thing in every case.
To learn how to configure roles and permissions, follow the directions below.
- Creating New Roles
- Defining and Editing Permissions
- Removing Permissions
- Deactivating Roles
- User Create and Update: Defining role assignment
- Deleting Roles
Creating Custom Roles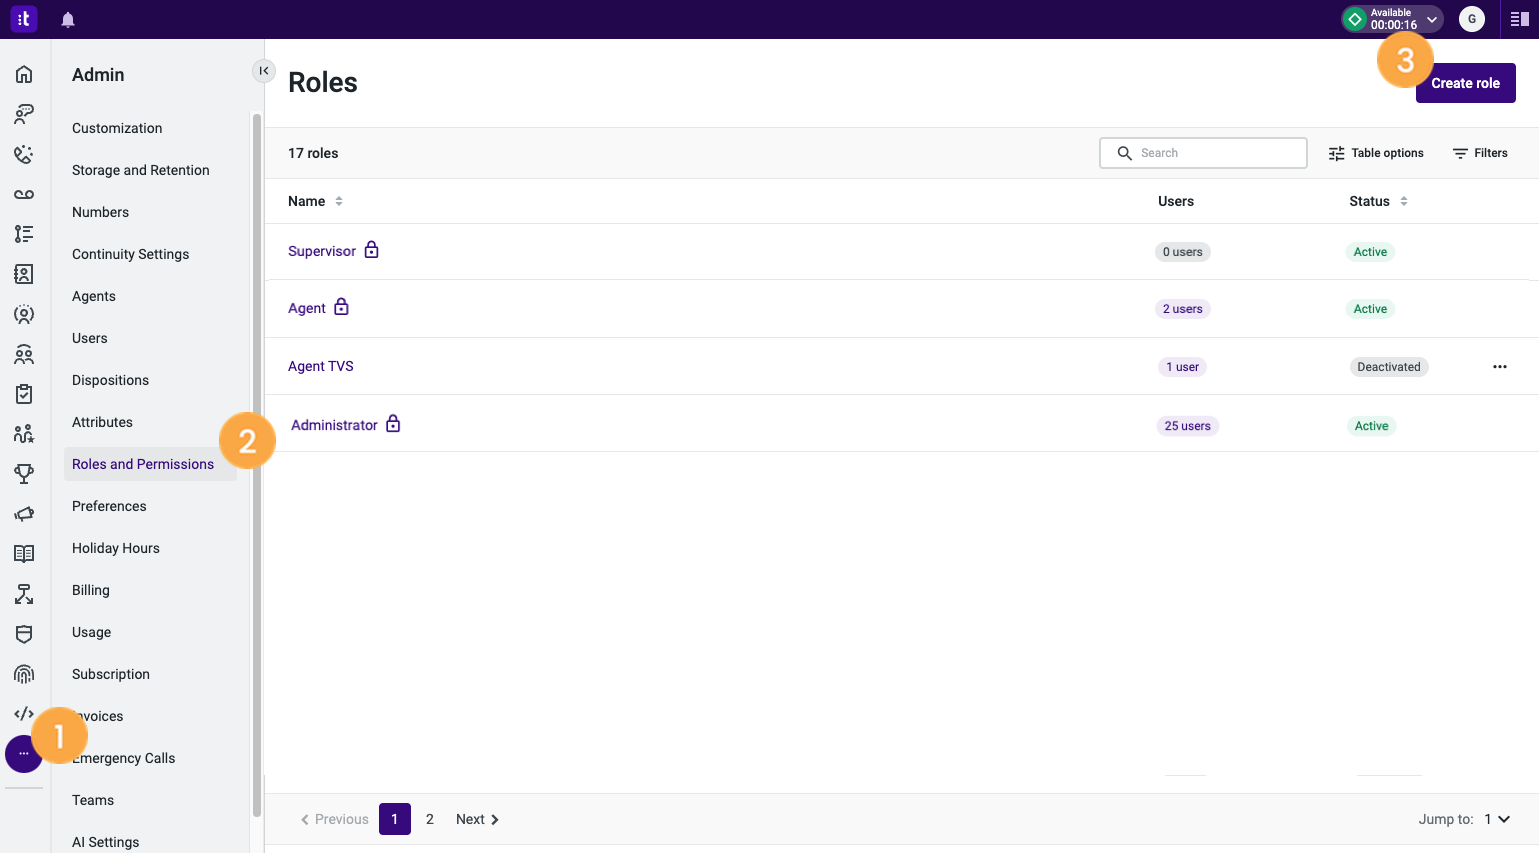
- Log in to your Talkdesk account as an Administrator.
- Select the Admin App [1].
- Click on the Roles and Permissions section [2].
- The account’s default roles will be displayed with a lock sign. You can define the permissions for Supervisor or Agent default roles or create a new role by clicking the Create role button [3].
- Provide a “Name” [4] and a “Description” [5] for the new role.
- Use the toggle to define the initial status of the role: “Active” or “Deactivated” [6].
-
When finished, click Create [7].
- When the new role is created, the “Details” page will be displayed. Verify that the details entered correspond to your needs, or click Edit [8] to make changes, if necessary.
- To start adding permissions to your newly created role, click the Permissions [9] tab.
Defining and Editing Permissions
- You can define permissions for the newly created role, by selecting the option Add permissions [1].
- You can also use a permission setup that has been previously configured for another role by clicking on Copy from an existing role[2], choosing the desired role from the dropdown menu, and clicking Copy to confirm your selection.
- Adding permissions can also be done on the “Roles” main page, by clicking on the more options "...” button [3]next to the role that you wish to configure.
Note: The more options "..." button is not available in the Administrator role because its default permissions cannot be edited.
- In either case, you will be directed to this page, where all the permissions are listed. Click the expand-collapse arrow button to select the application you would like to configure the permissions and scope for each application [4].
- Select the buttons next to the name of the area to define the level of access you wish to grant to the users that belong to this role [5]. You can allow them to (when applicable):
-
To configure the scope for each application, select the dropdown in the column Scope[6].
- Create (e.g., create new contacts, add new numbers or agents, among others).
- View the feature or item (e.g., call recordings).
- Update settings (e.g., edit ring groups in the agent’s profile).
- And/or Delete settings for the feature (e.g. delete agents, and numbers, among others).
Selecting Scopes while Configuring Permissions:
Talkdesk products support scoping by defining and restricting user access to specific features, data, or actions within the platform based on assigned roles and permissions on two levels:
Scope by Application: The scope selected is applied to all the application areas and permissions.
Scope by Area: The administrator can define a different scope for each area within the application. This means that the selected scope is applied only to the area it belongs. For example, you can define a different scope per dashboard:
- Select the data scope that users can view in each specific Talkdesk application from the “Select scope” dropdown menu:
- All: The user will see all the information related to the account.
- Team: The user will only see information related to the team assigned to them.
- Child Teams: The user will only see information related to the child teams of the team assigned to them.
- Team + Child Teams: The user will only see information related to the team assigned to them and their child teams.
- Ring Group: The user will only see information related to the ring groups assigned to them.
- User: The user will only see information related to them.
- When you have finished configuring the permissions, click Save at the top of the screen.
- On the Roles’ main page, you will be able to see your created roles, along with the default roles. Here, you can:
- Search for the desired role [8].
- Choose the number of results you wish to view on the page [9].
- Filter by Role status – “Active”, “Deactivated”, or “All status” [10].
- Use the up-down arrow buttons next to “Name” and “Status” to order the results alphabetically [11].
- Confirm the status of the role [12].
- When the roles and permissions are configured, you can proceed to assign agents to the roles.
Removing Permissions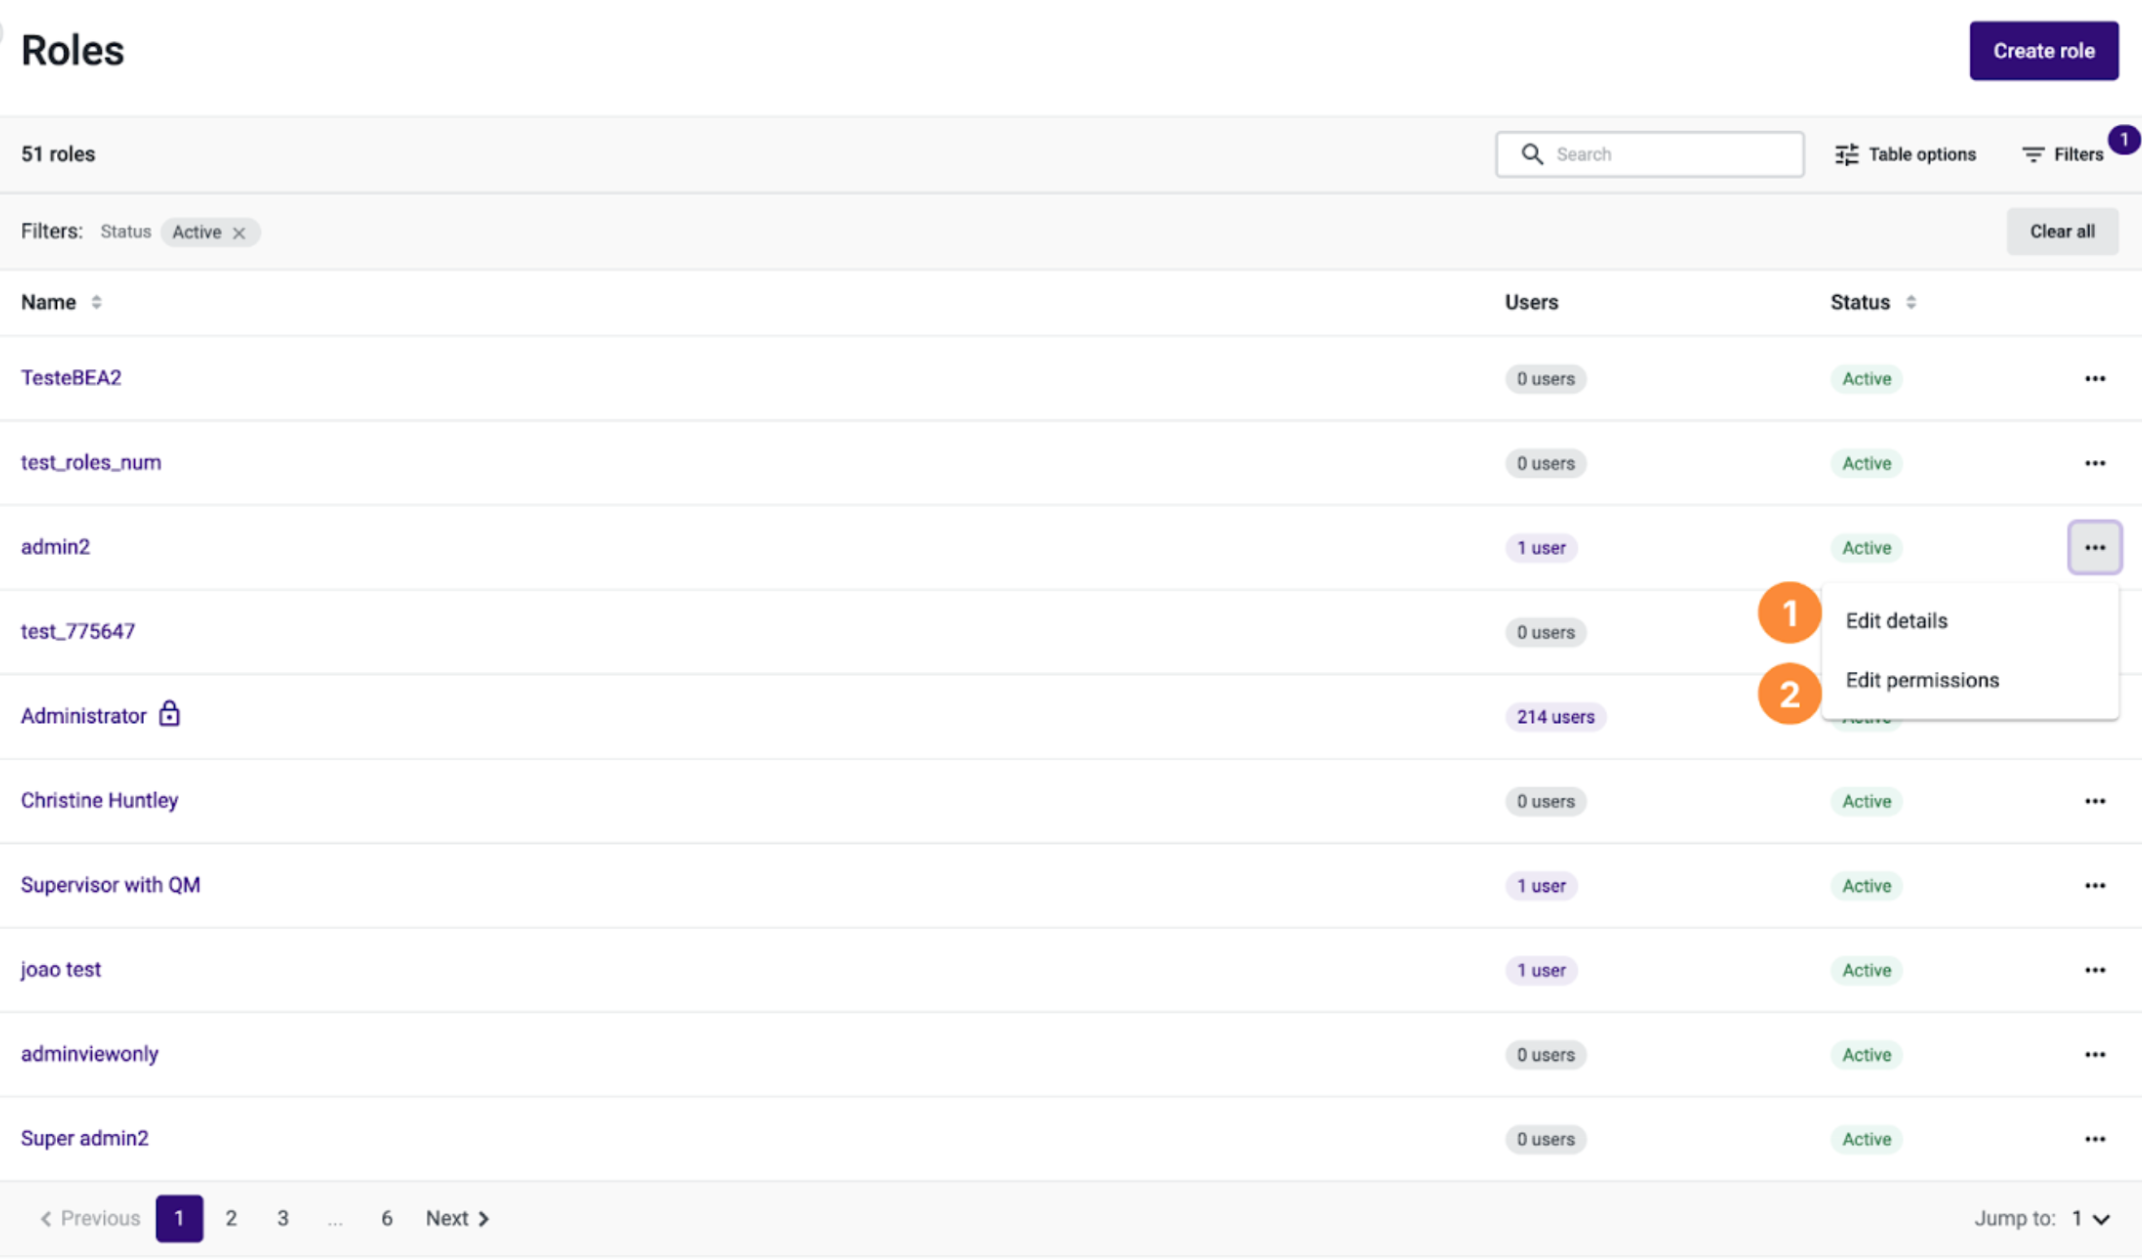
- To remove permissions, click on the more options “...” button of the relevant role [1] and select Edit permissions [2].
- Alternatively, you can click on the name of the desired role and select the Permissions tab [3]. Here, you can see the number of applications that are enabled for the role [4], as well as the permissions that are currently active within the application [5] and that you may wish to remove. If you wish to see all the permissions available for the roles, switch the toggle to the “on” position [6].
- Select Edit [7].
- Scroll down to the desired application and click the expand-collapse arrow button [8].
- Click on the permission that you wish to remove [9] or click on Deselect all [10] button if you wish to remove all the permissions for the area.
- When finished, click Save [11].
Note: Please be aware that the permissions of the Administrator roles cannot be changed or removed.
Deactivating Roles
- On the “Roles” page, click on the name of the role that you wish to deactivate [1] or click on the more options “...” button of the relevant role [2], followed by Edit details [3].
- Once on the “Details” page, click “Edit”.
- When the role’s page is displayed, switch the toggle to its “off” position [4].
- Click Save [5] to complete the process.
Note: Please be aware that only the custom roles can be deactivated and that the default roles – Agent, Supervisor, and Administrator – cannot be deactivated.
User Create and Update: Defining role assignment
When defining the Create or Update permissions for the Admin > Agents area, it’s possible to assign which roles can be assigned when a user is created/updated.
Use case: A Supervisor can create and/or update new users with the Agent role but can’t create users with the Admin or update a user to that role.
To access this functionality, navigate to the edit permissions page for a specific role. When adding the Create or Update permission, a new area will appear below the Permissions [1].
There are two available options:
- “All existing and new roles” [2]: This option will allow the users assigned to the role being updated, to assign every available role, including roles that will be created after the saved permission, when creating and/or updating users.
- “Custom” [3]: This option allows you to select roles that will be available when creating and/or updating users. Afterwards, a selection menu will appear.
To select the roles on the custom option, click on the preferred roles' checkbox [1]. It’s can also search for roles [2] or select all [3].
Note: After selecting all role, the newly assigned role users can assign every available role when creating and/or updating users. If a new role is created after the permissions have been saved, it will not be included in the role selection.
To view which roles are assigned to these permissions, go to the view permissions page and search for a specific role.
If the Create and/or Update permissions are selected, a new area will be available below to showcase the Roles Assignment list [1] or, in case you choose All existing and new roles was selected, a message appears.
Notes: The Role assignment functionality is only available on the Users’app. It’s not included if the user is created/updated via Bulk Management.
Deleting Roles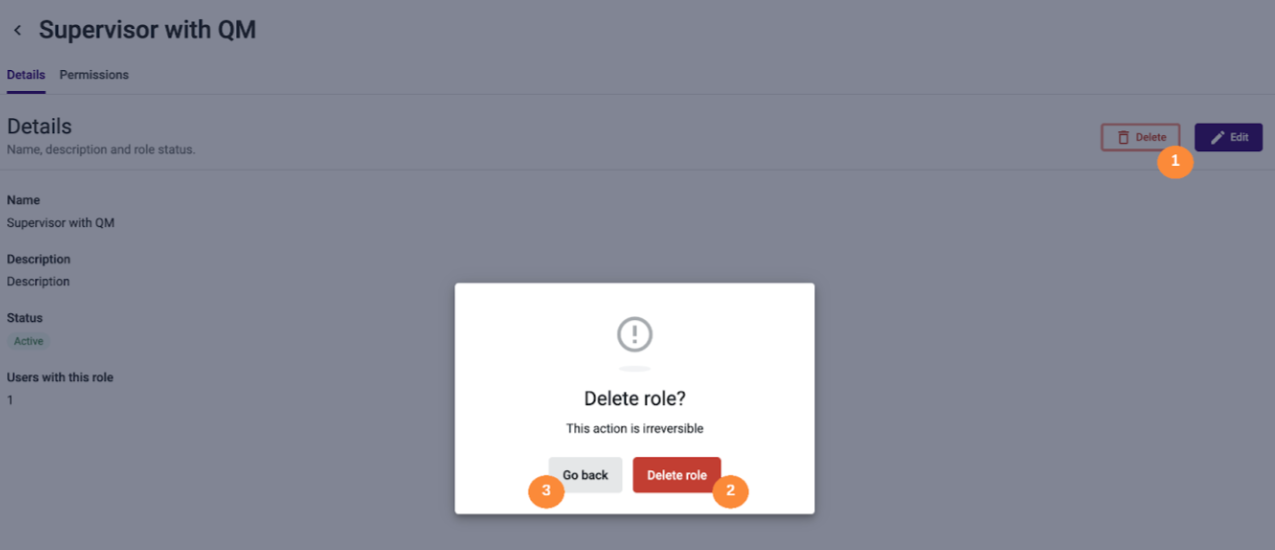
- Navigate to the Roles and Permissions section for the role you wish to delete
- Click the Delete button [1].
A confirmation modal will appear with the option to Delete role [2], click this option to remove the role (if the role has no associated users or allow lists, the platform will process your request automatically). Click Go back [3]to cancel the deletion and return to the role's screen without making any changes.
If the role has associated users, the total number of “Users with this Role” field [4] will display how many users are assigned to this role. Additionally, a toast notification in the bottom-right corner of the screen [5] will alert you if users are associated with this role. In that case, you can navigate to the Users app, select the user(s) assigned to the role you wish to delete, and reassign them to a different role.
If the role has associated users and allowlists, a toast notification in the bottom-right corner of the screen [6] will alert you. In that case, go to the Roles app, select the Role, edit the permissions in "Admin-People" section and review the allowlists in the "Users" Area.