Voicemails, an Agent Productivity App that is a part of Agent Workspace, allows you to access and handle all Voicemails in one single setting.
Below, you can read our guide to learn more about:
Accessing each Voicemail’s Details
Accessing the Voicemails App
To access the app, look for the “Voicemails” [1] icon on the left Dock. Click it to open it.
Using the Voicemails Inbox
The Voicemails app features an Inbox with two listings:
- The Assigned to me [1] tab displays all the voicemails that are assigned specifically to you.
- The All voicemails [2] tab is where you can check all the system’s voicemails (within your viewing permissions).
When you select one of the lists, the Voicemails app will display the total number of voicemails [3] that are under that category. The listing is done in chronological order, with the most recent ones at the top. You will be able to see information about the “Status”:
- “Open” [4]: When the voicemail needs to be handled by an agent
- “Resolved” [5]: When the voicemail was already handled by an agent.
You can also find more details, as both listings contain the following columns:
- “Contact”: The name and/or number associated with the customer’s call
- “Assigned to”: The agent in your organization assigned to the voicemail. Voicemails can be reassigned to another team or person if you have the required permissions.
- “When”: The date and time the voicemail was received.
- “Duration”: The duration of the voicemail in minutes and seconds.
- “Ring group(s)”: Which Ring Groups are associated with this voicemail.
On the right-hand side of the list, each row presents 3 quick action buttons that allow you to perform quicker and more efficient tasks:
- “Play” [6]: When you click on the play button, It will open a side panel with a tab where you can listen to the recording.
- “Re-Open/Resolve” [7]: Manage a voicemail by clicking on this button and changing its status. Resolved voicemails can be reopened at any time (if you have permission to do so).
- “Click-to-Call” [8]: Immediately begin a call with the contact (via the Conversations app).
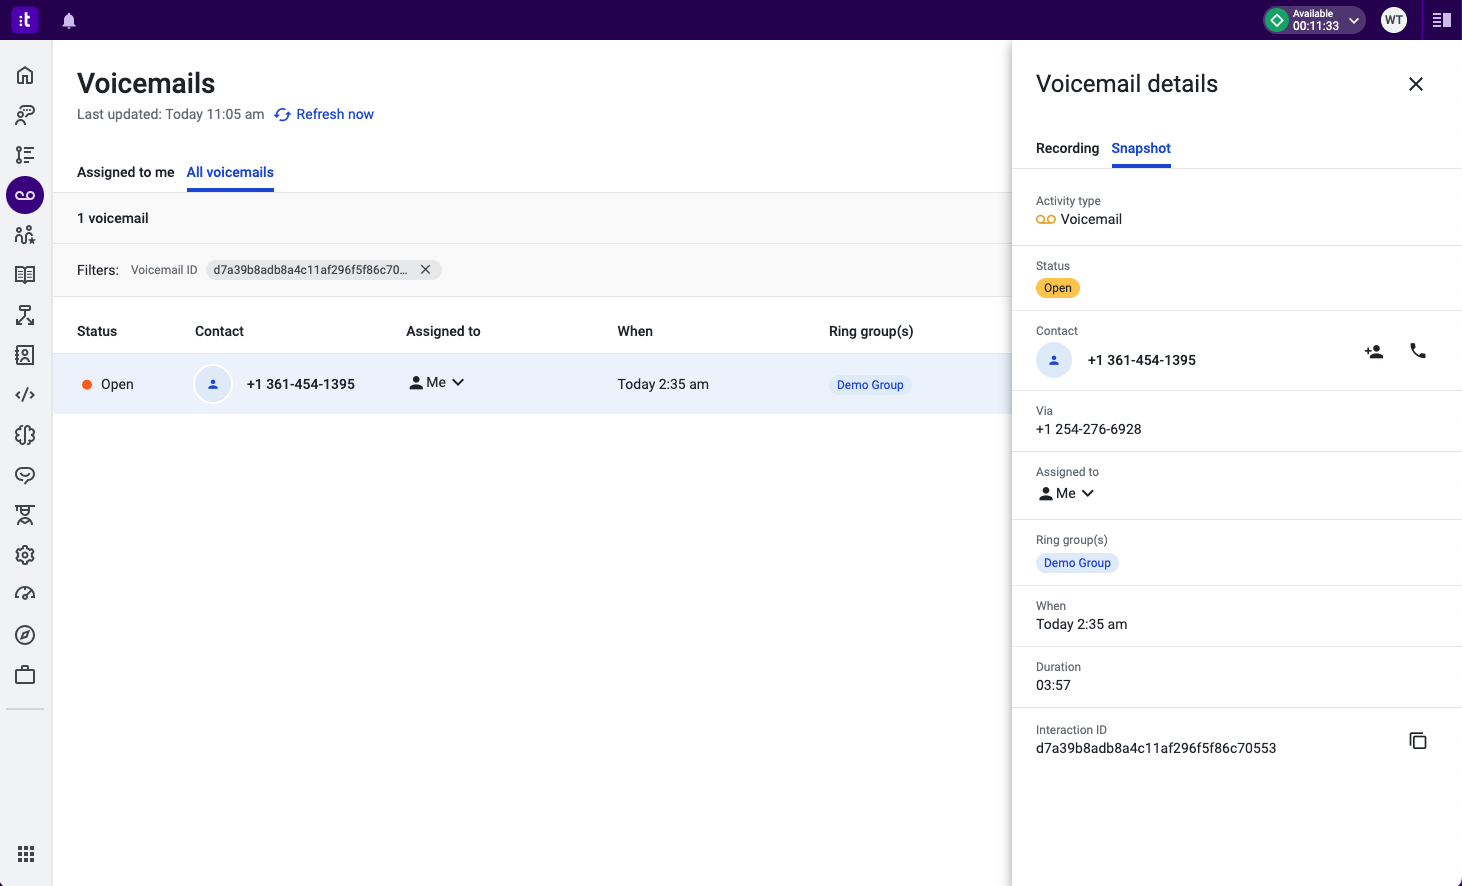
Accessing each Voicemail’s Details
When selecting a specific voicemail by clicking on its respective row, the app will display the details of that voicemail.
The screen is divided into two tabs.
Recording Tab
Talkdesk allows the recording of voicemails. We store these files on our secure infrastructure and provide access via a modal, presented across our platform in various ways.
Users need to be authenticated and have the right permission to play a voicemail recording in Talkdesk and be able to download it (assigned via “Admin” > “Roles & Permissions” > “Permissions” > “Voicemails” > “Listen to Voicemails and Download Voicemails”). If logged out, agents are required to log in prior to being able to play the recording.
The "Download" option is available in "Voicemails details", within the "Snapshot" tab.
Should you wish to extract URLs in bulk instead, you will need to export call data as a .csv file (admin permissions required).
Using the exported file you will see a column for the recording URL and can access the URL using whatever method you choose.
On the Recording tab, you can listen to the voicemail recording [1]. If applicable to your account, you will also see a “Transcription” [2] of the call’s audio displayed beneath the player.
You can either resolve or re-open the voicemail on this panel, by clicking on the Resolve/Re-Open [3] button. Updating the status on this panel will also automatically update this voicemail’s status on the main list.
Note: Clicking on the “More Options” [4] button allows you to download a recording of the voicemail.
Snapshot Tab
Featuring information related to the voicemail, the Snapshot tab [5] shows the “Activity type”, the number/name of the contact that sent the voicemail (also including a Click-to-Call quick action button), the number that received the call, the agent to whom the voicemail is assigned, and the associated Ring groups.
Also displayed are the time of the call, its duration, and the call’s Unique Caller ID number (with a “Copy to Clipboard” quick action button).
Note: Clicking on the name/number of the contact in the main listing will immediately take you to the Contacts app, where you will be able to edit all details regarding this customer. To know more on how to properly edit a contact’s details, please go here for our Contacts documentation.
Assigning Voicemails
Delegating or re-assigning voicemails to specific agents can be done using two different methods.
The first method [1] is by using the main voicemail listing and selecting a name under the “Assigned to” column. The second method [2] is by accessing the “Snapshot” tab and making a selection from the “Assigned to” field.
In both cases, click the available dropdown menu and choose one of the following options:
- Me: Assign the voicemail to yourself.
- Unassigned: Unassign the voicemail from someone.
- Scroll down the list, or use the search box, to search for the agent to whom you wish to assign the voicemail.
Using Filters in Searches
Using the app’s filters is the most efficient way to seek specific information on the viewing list. These criteria-based searches are available on both the “All voicemails” and “Assigned to me” tabs.
The “Filters” icon [1] is visible on the top-right side of the screen. Clicking it opens a right-side panel with a listing of the filter(s) [2] that you can add to your search’s settings. One or multiple filters can be applied to a search.
The available filters are:
- “Status”: If a voicemail is Open or Resolved.
- “Contact”: The customer’s name or number that is associated with the voicemail.
- “Assigned to”: The agent that the voicemail has been assigned to.
- “When”: When the voicemail was left.
- “Ring group(s)”: Which ring groups are associated with the voicemail. One or more ring groups can be selected for this search, which will display voicemails associated with any of the selected ring groups. For more information about ring groups, you can read this article.
- “Duration”: This option filters voicemails based on their length. You can refine your search by searching for a specific length or by establishing a minimum or maximum length (in minutes or seconds).
You must click the Apply [3] button at the end of your filter selection in order to validate the search.
Once the chosen filters are applied, the main tab will feature the total number of voicemails that correspond to the selected filter criteria [4]. An “Active Filters” information bar [5] will be displayed below. Additionally, a blue badge icon [6] will be shown over the Filters button, informing of how many filters are currently active.
Filters can be removed individually by clicking the “x” icon that is next to each filter’s name. You can also remove all filters by clicking the Clear all [7] button. After each of these actions, the voicemail list is automatically refreshed, reflecting the new search instructions.
Number Masking in Voicemails
Number Masking allows Admins to determine whether Agents should have access to the contact persons' phone numbers or if these should be masked.
This Admin setting must be configured by one of the following methods:
- Per agent: Admin > Agents [select an Agent] > Privacy Settings > Mask Information: Phone Number.
- In bulk: Select multiple Agents in Admin > Agents [select Agents] > Actions > Privacy Settings > Mask Information: Phone Number.
Upon enabling the setting, Admins and Agents must reload Talkdesk Workspace to begin utilizing this feature.
Notes:
- This feature is available for Conversations (Voice) and Voicemails only; it is not available in Digital Channels, the Conversations Mobile App, or other Talkdesk Workspace apps.
-
When Number Masking is enabled, all phone numbers in the Voicemails App will be masked:
- Column “Contact”.
- Voicemail’s details > Snapshot tab > Contact info, in Filters > Contact filter, where Agents are only allowed to search by contact name.
- In the event of momentary issues retrieving Workspace settings, Talkdesk will assume Number Masking is enabled. Reloading Talkdesk Workspace will resolve this situation.
Voicemail Notifications
Notifications in Workspace Notification Center
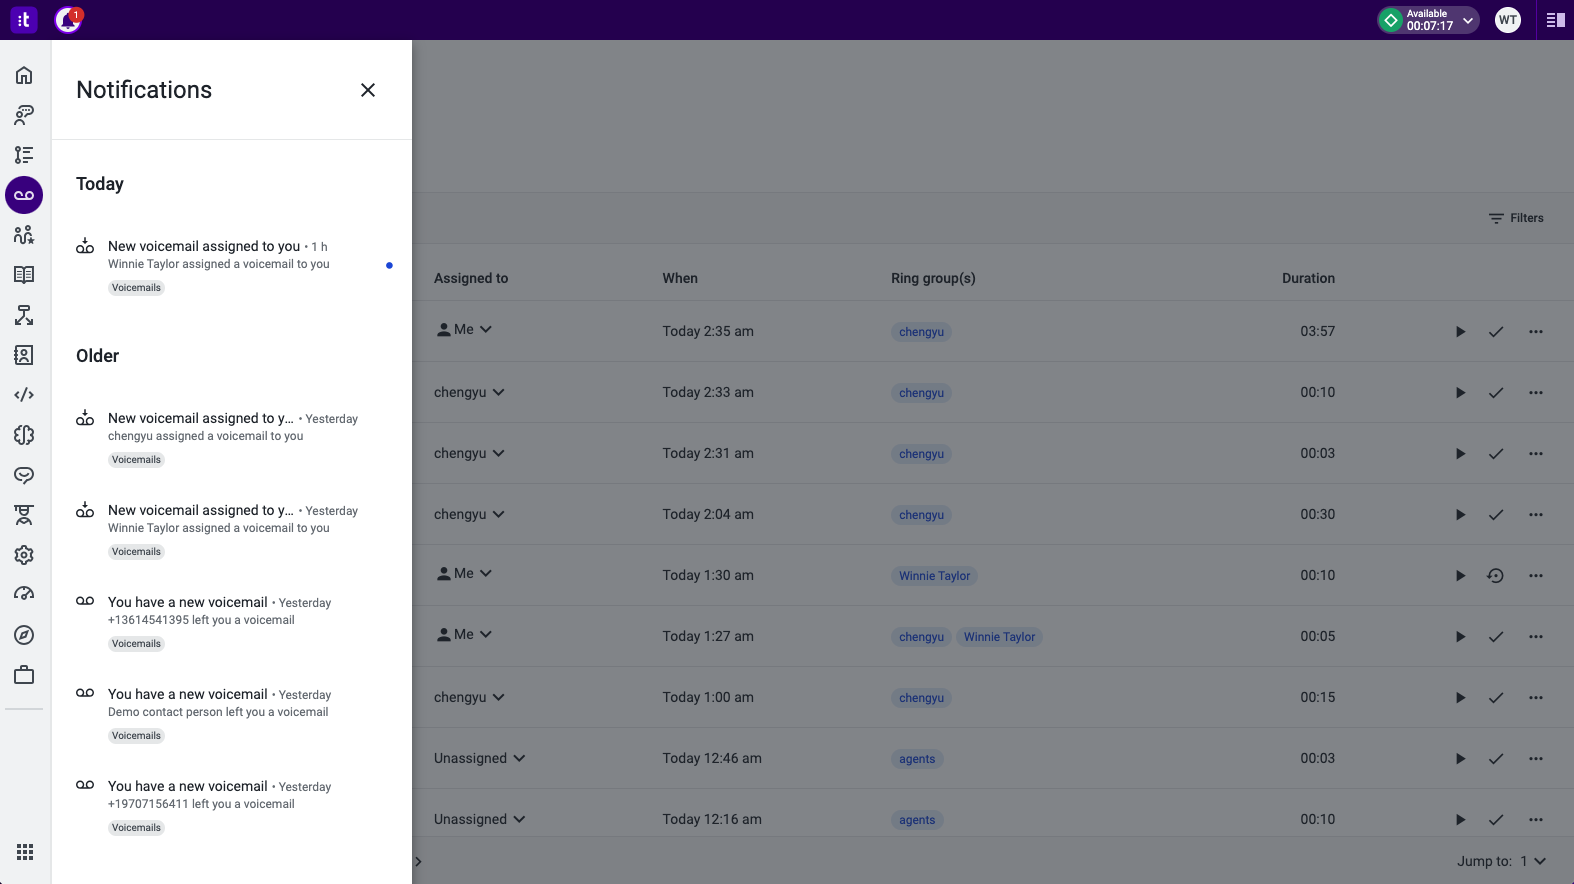
Agents will receive real-time notifications in the Workspace Notification Center when a new voicemail lands on their dedicated line or is assigned by a supervisor.
By clicking on the notification, agents will be redirected to the Voicemails app. There, the associated voicemail will be filtered and displayed as the single item in the voicemail list. Simultaneously, the details of this particular voicemail will be automatically opened, allowing for immediate access and management.
Email Notifications
It is possible to set up automations to send email notifications triggered by voicemails’ actions. For more information, please refer to this article.
Additional Resources