This article features a guide for Administrators to manage Digital Engagement's Social Messaging channels.
- Existing Touchpoints
- Adding a New Touchpoint
- Managing Touchpoints
- Editing Touchpoint Configurations
- Removing Facebook Connections from Talkdesk
- Existing Touchpoints
- Number Configuration
- Removing WhatsApp Connections from Talkdesk
- Registering a WhatsApp Message Template
- Set a Template as the Default Template
- Understand the Templates' Status
Facebook Messenger
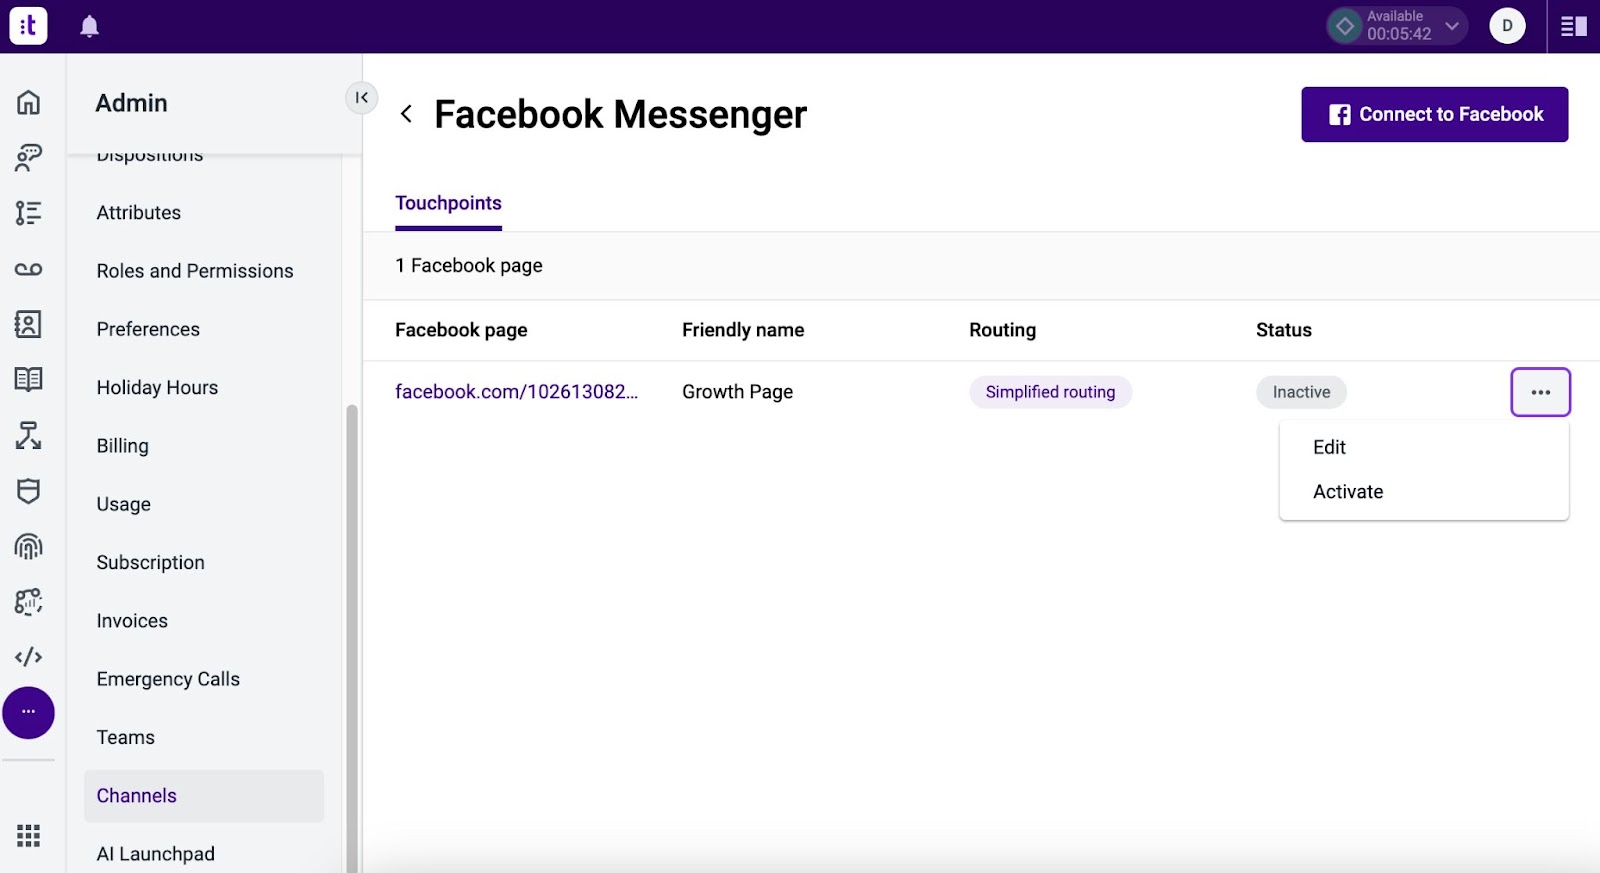
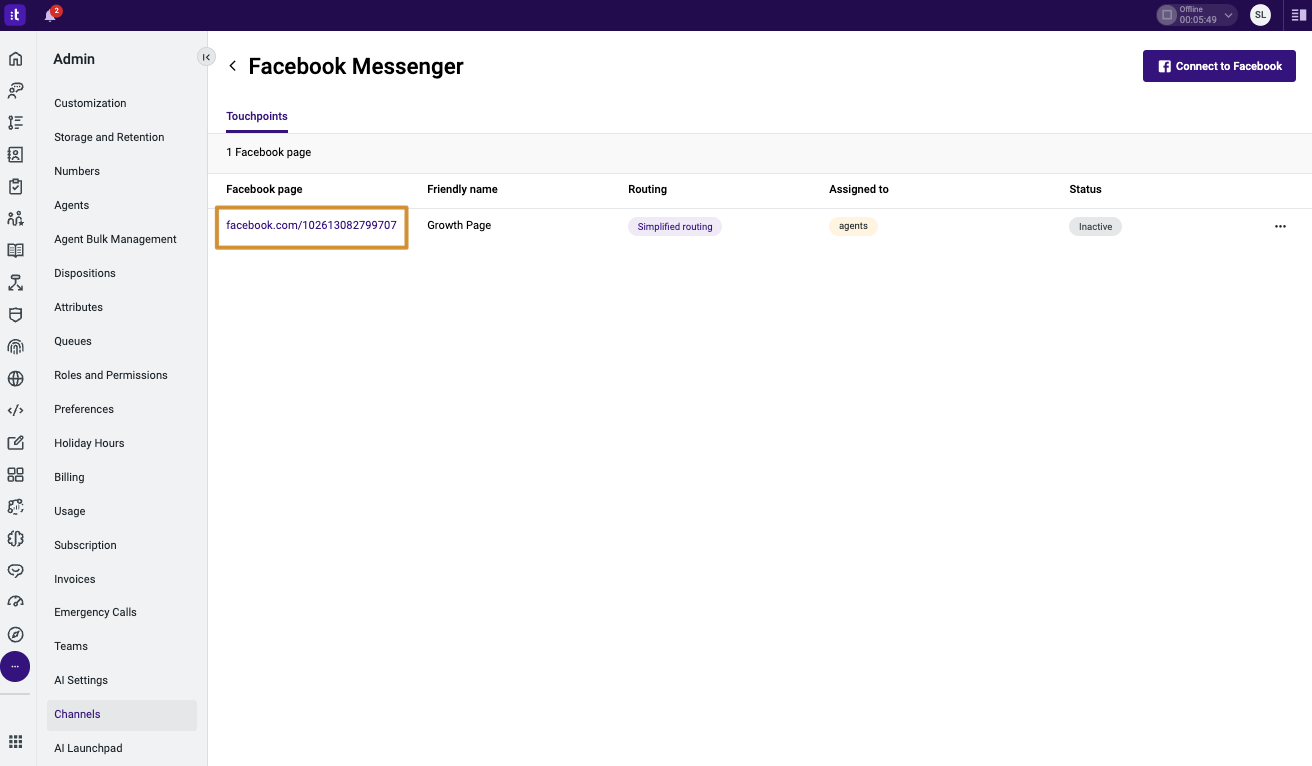
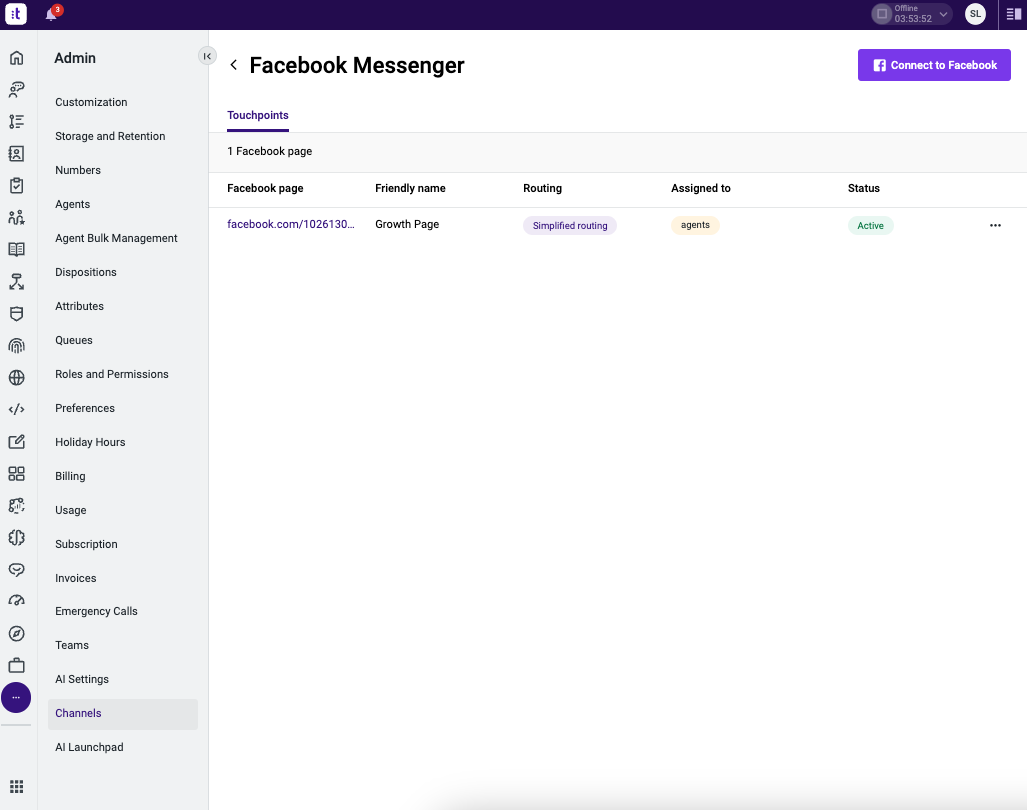
Existing Touchpoints
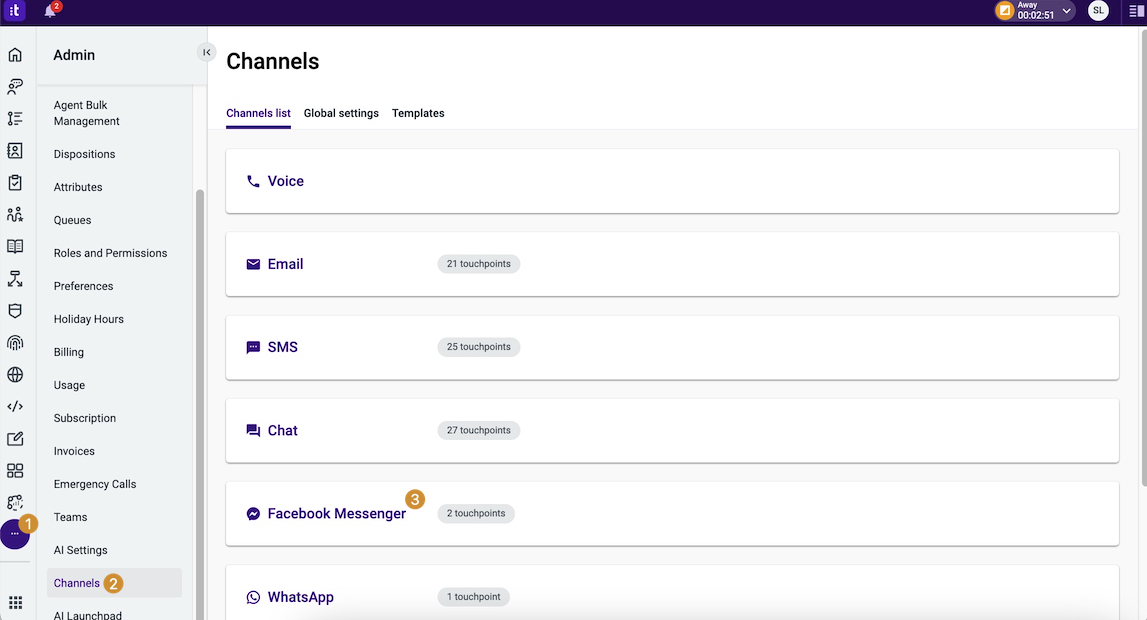
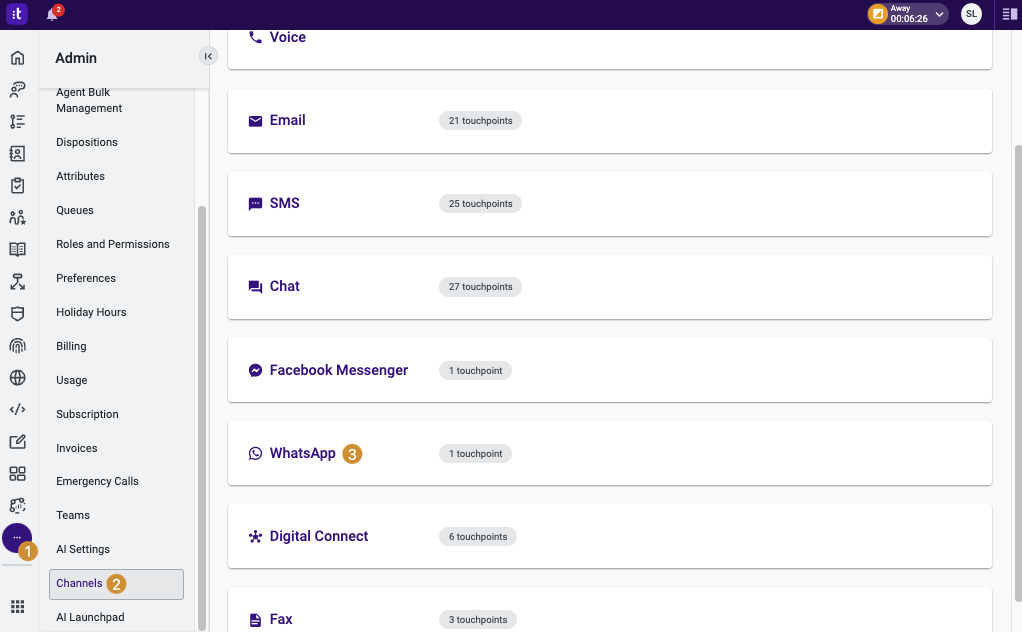
Access the “Admin” tab [1], and then navigate to Channels [2]. Here, you will be able to access the settings for the channels enabled for a specific account.
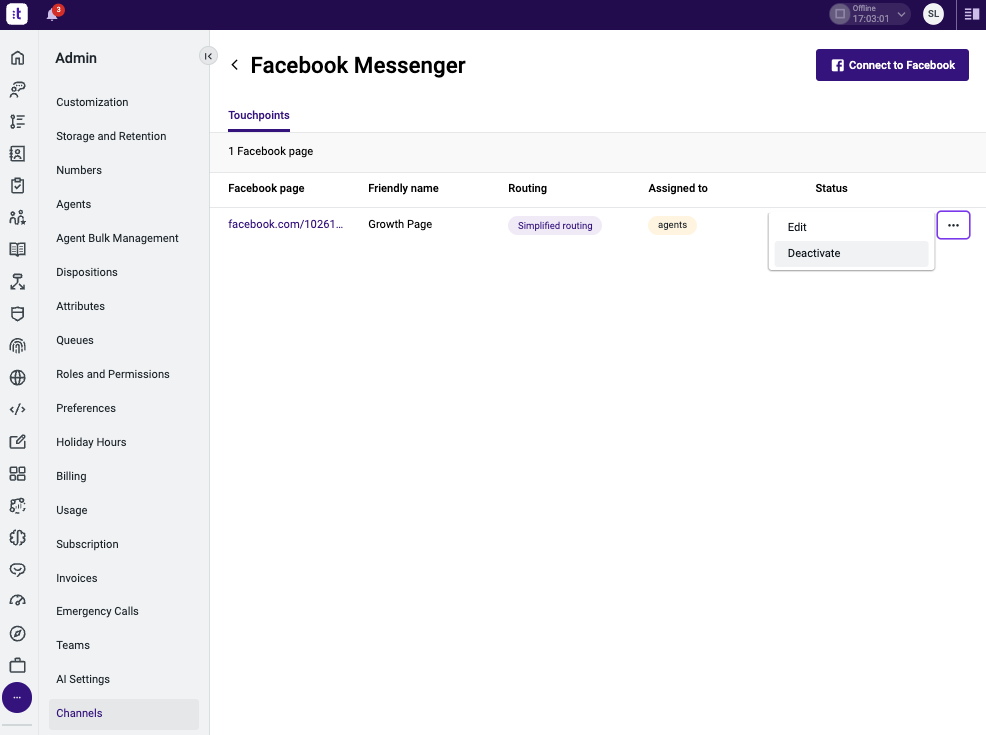
Each channel features a label indicating the number of touchpoints configured for it. Click the Facebook Messenger channel [3], to proceed to its respective Touchpoints list. Touchpoints are the points of contact used by the contact person to interact with a specific brand.
For Facebook Messenger channel, a Touchpoint represents a Facebook Page that is used to exchange messages between the brand and its customers.
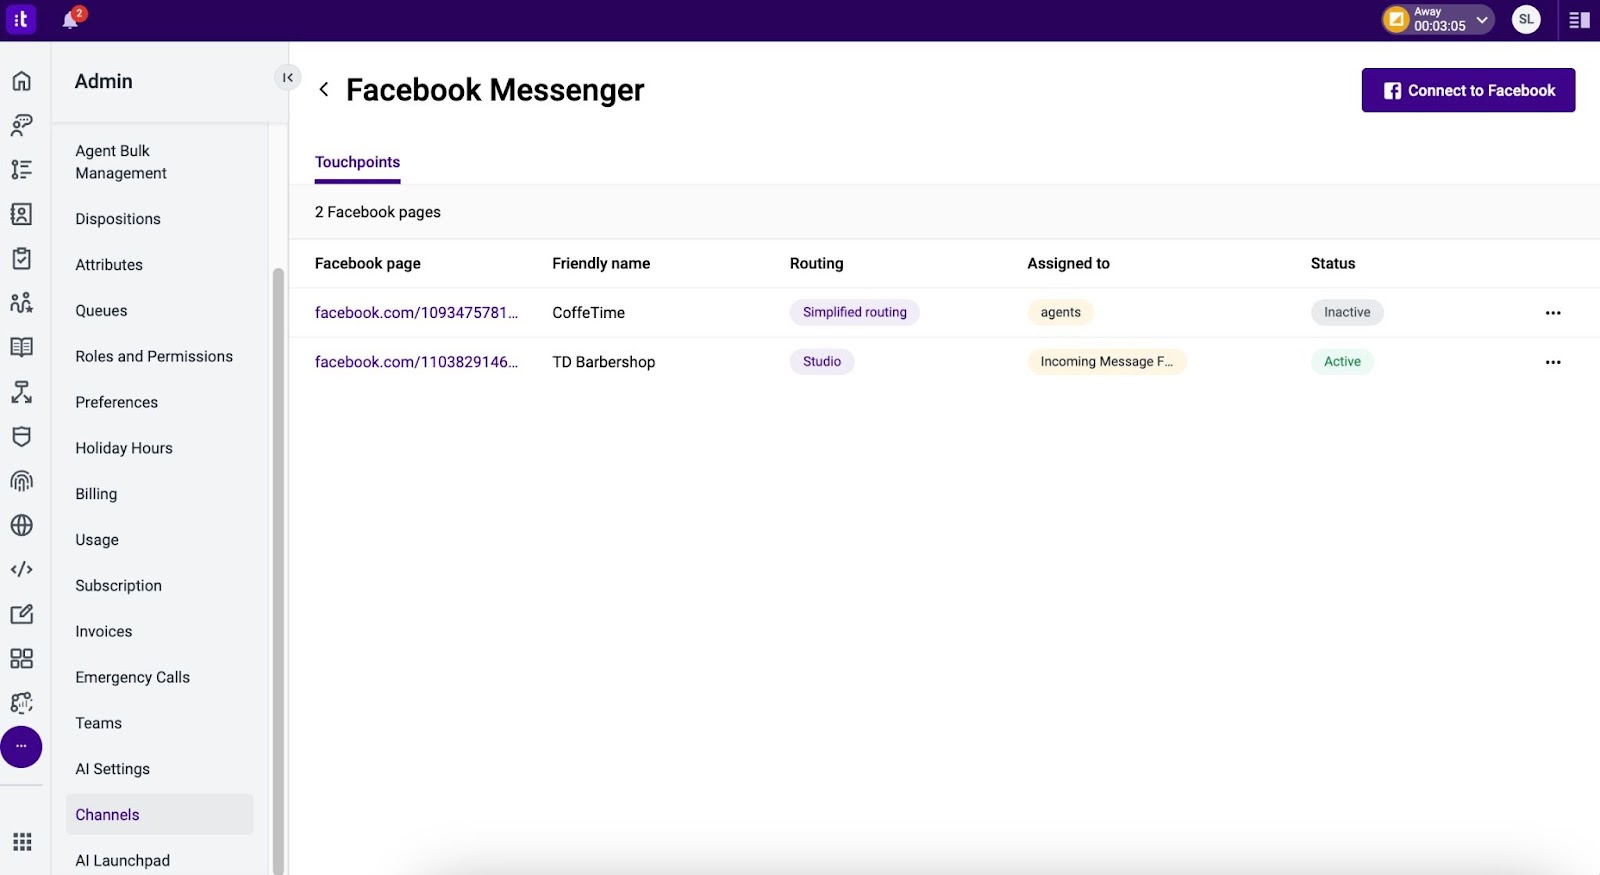
This tab presents the following information, divided by columns:
- “Facebook page”: Information on the location of the page.
- “Friendly Name”: The name you defined for the page.
- “Routing”: This configuration can be altered in “Edit” Mode.
- “Assigned to”: The connected Studio flow or Queues (for simplified routing). This configuration can also be altered in “Edit” Mode.
- “Status”: Shows the status of the page (“Active” or “Inactive”).
Adding a New Touchpoint
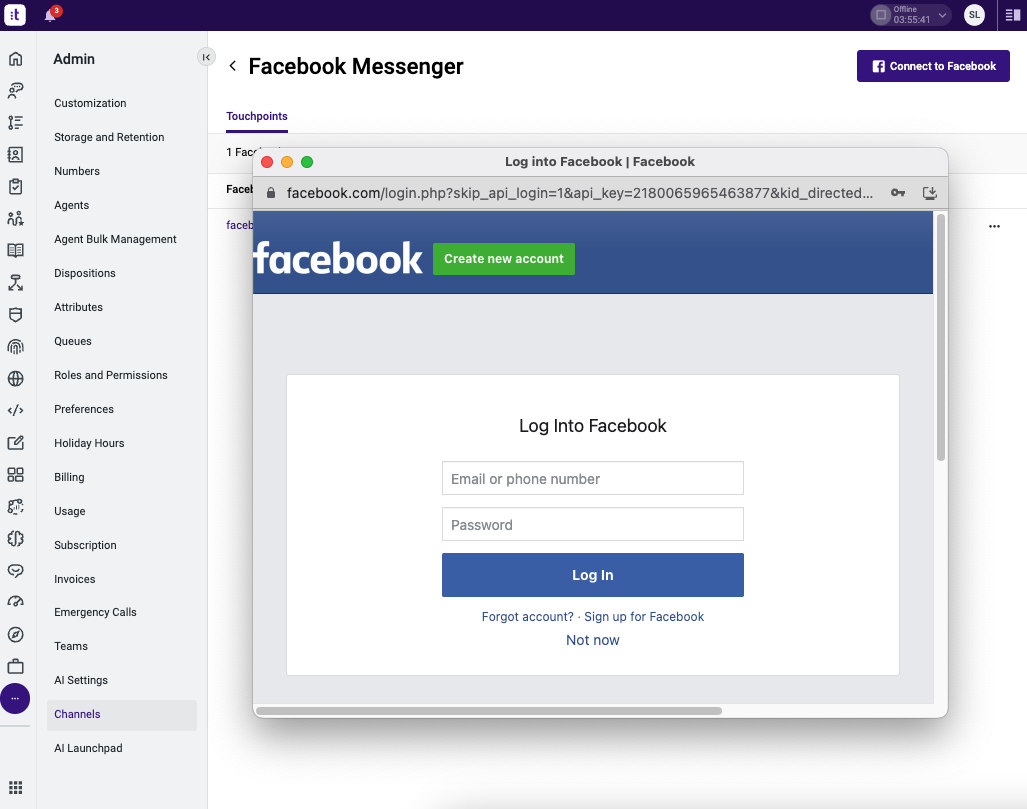
Click the Connect to Facebook button to connect to Facebook pages where you have Admin privileges.
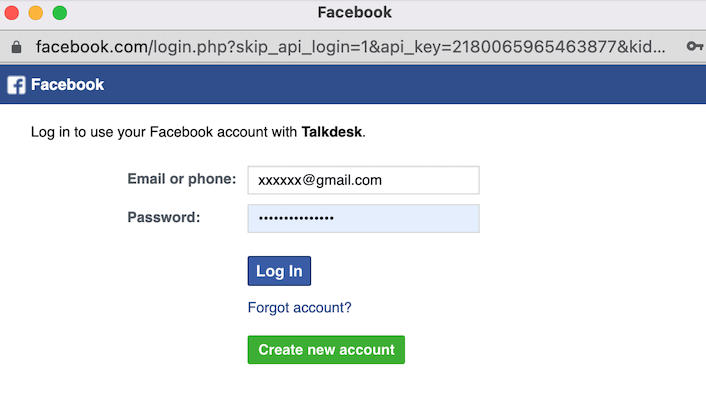
A new login window will appear, prompting you to log in to your Facebook Account. If you are not previously logged into Facebook, you will have to do so. If you are already logged in, the next step screen will appear automatically.
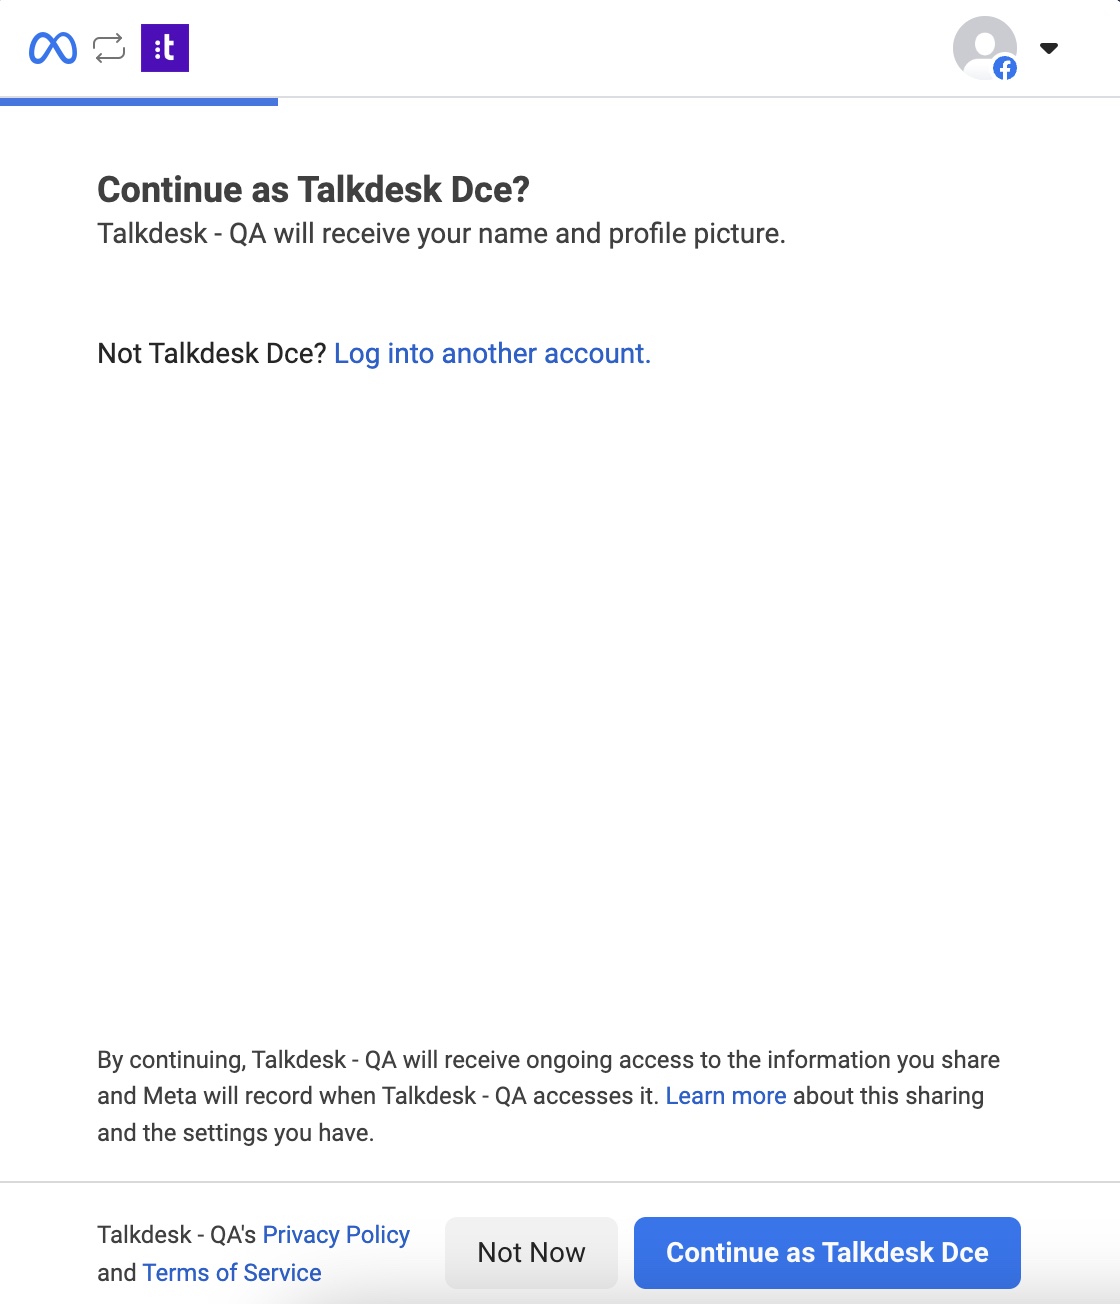
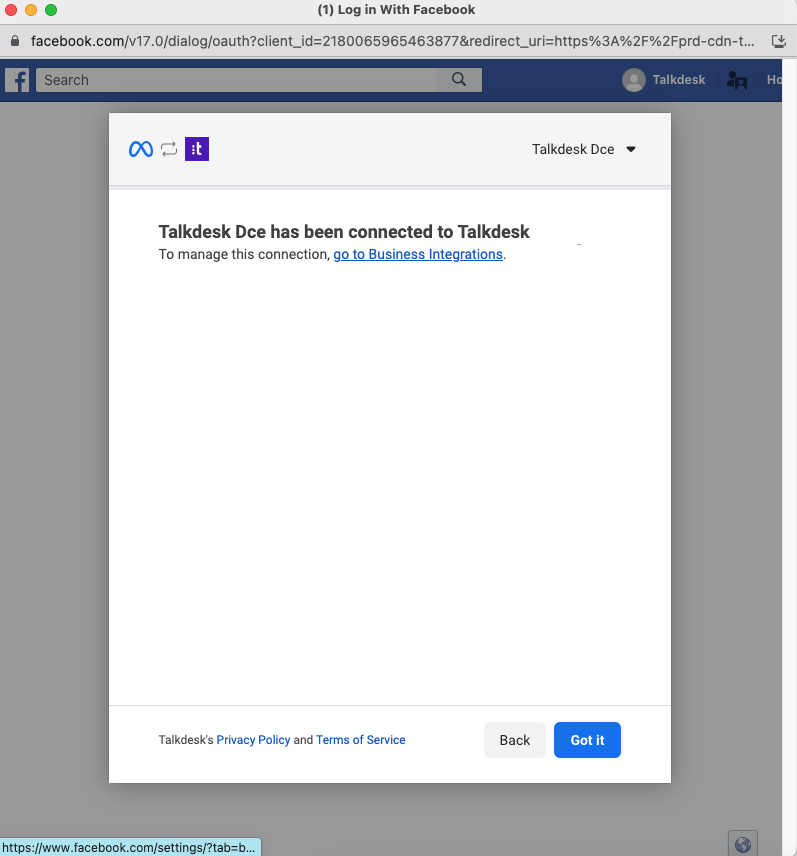
After login or if the login has already been done, a confirmation window will appear. Click the Continue as… button to proceed.
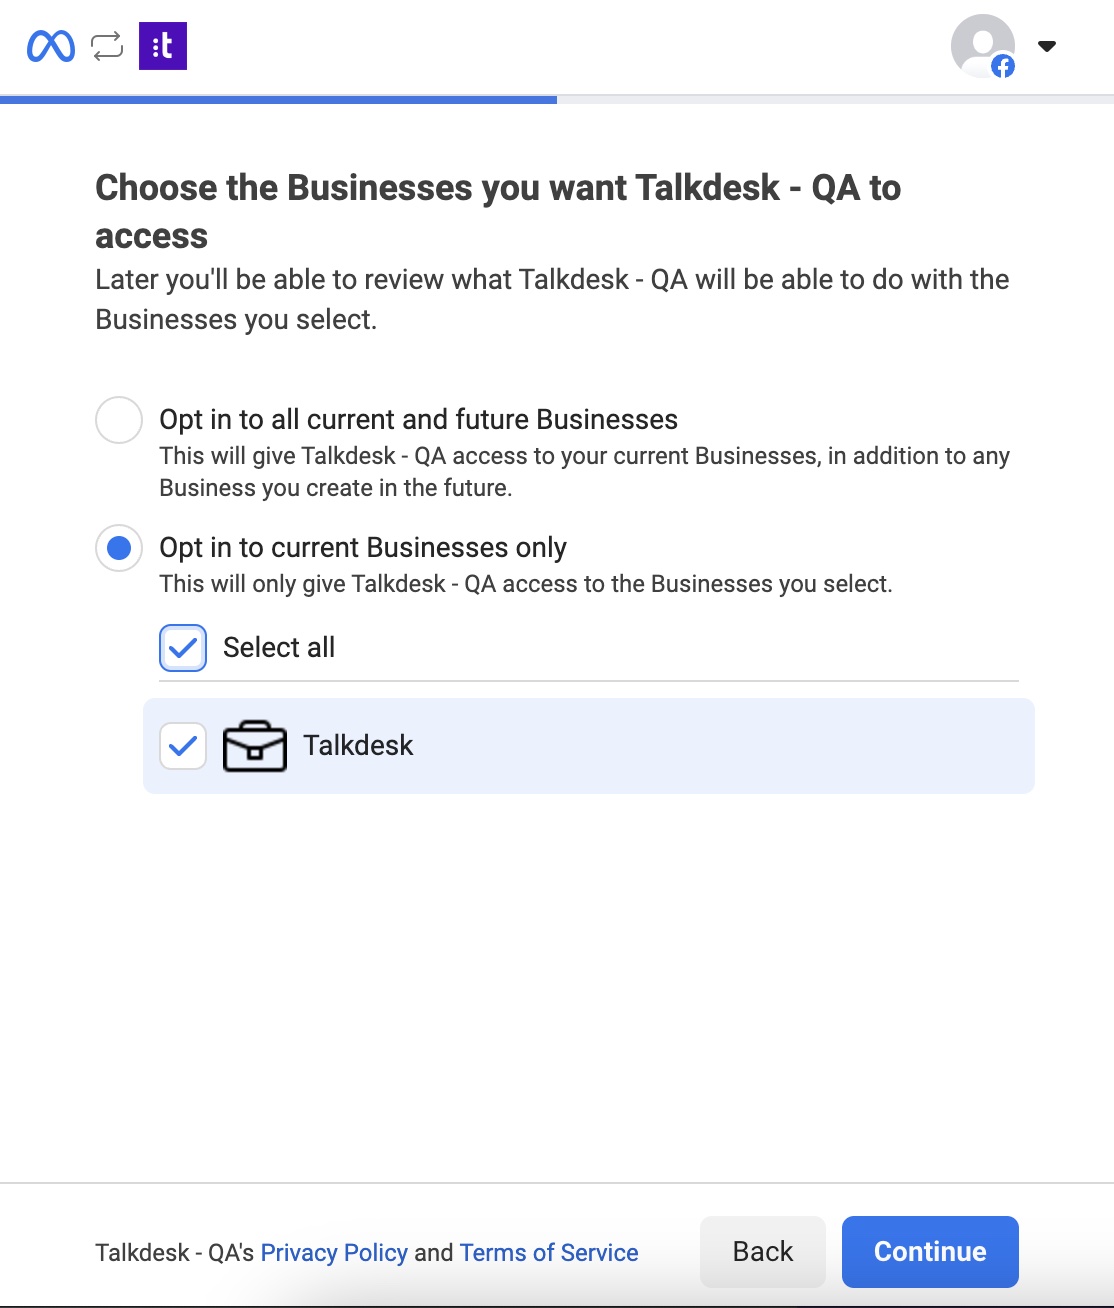
Select the Meta Businesses Accounts that you want to connect to your Talkdesk Account.
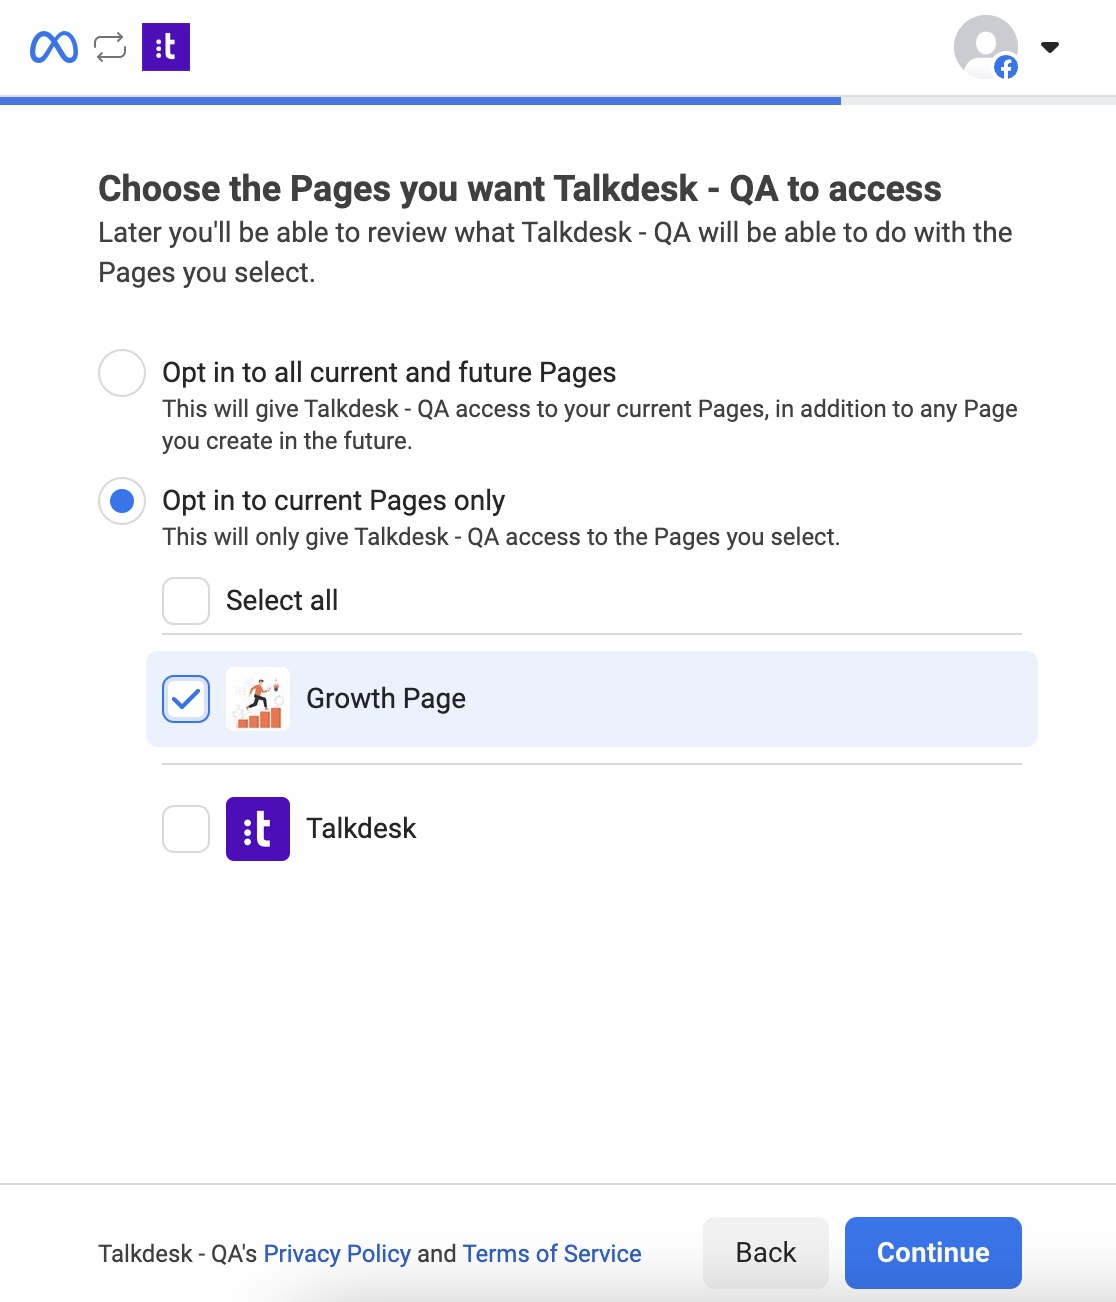
Now you can access a list of the Facebook pages you can connect to. Select the one(s) you wish to activate for your Talkdesk account.
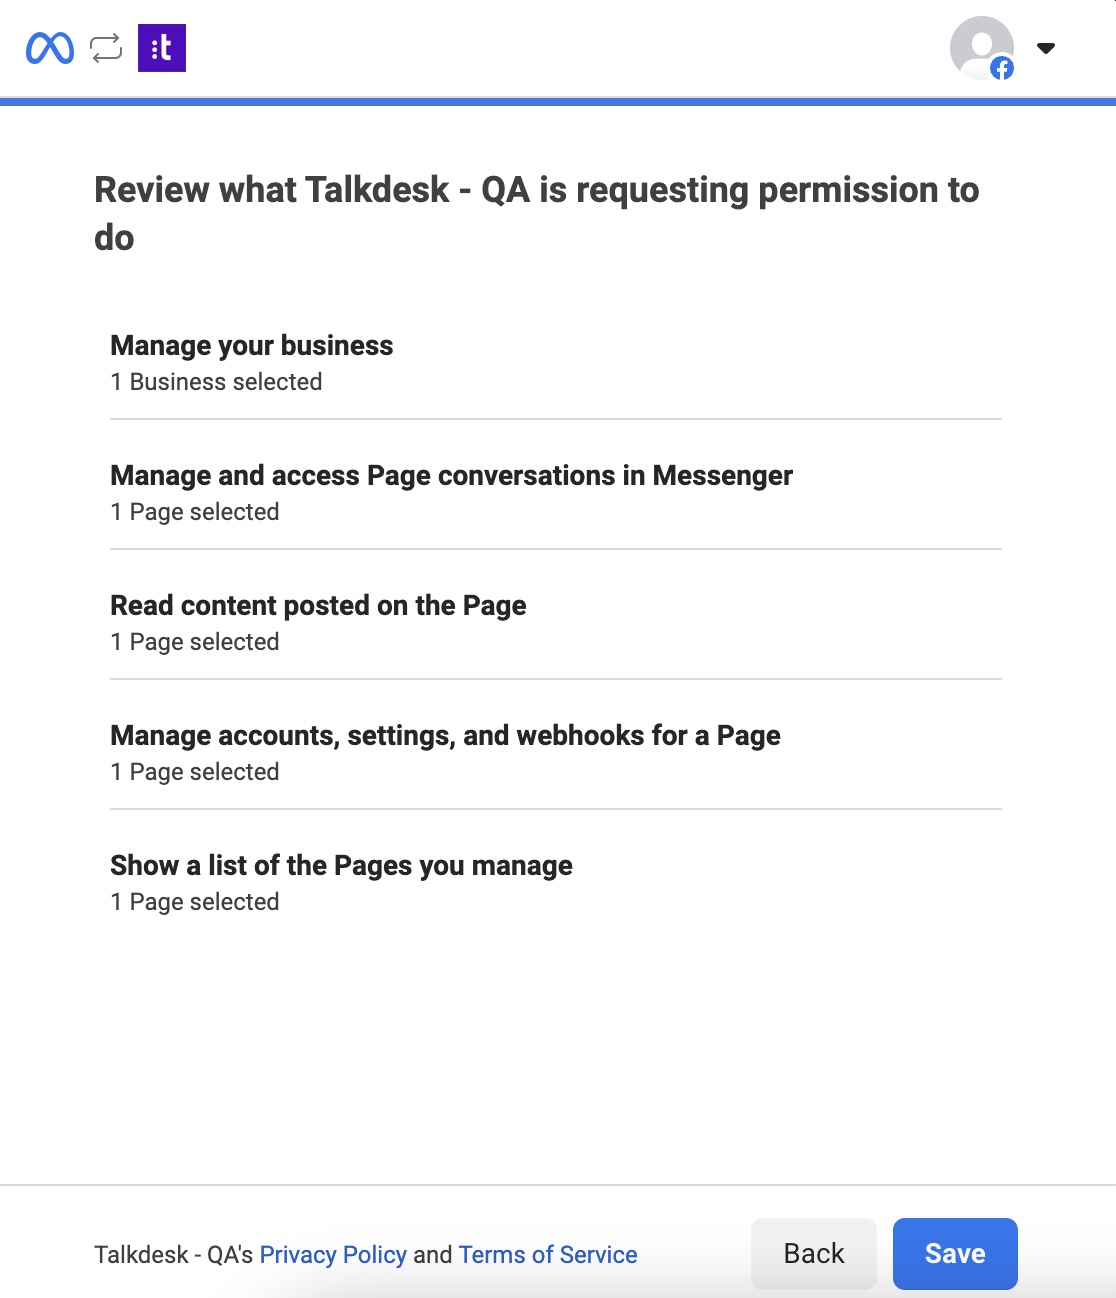
Next, you will need to confirm Talkdesk’s permissions regarding these pages.
If the connection is successful, the Facebook page(s) you chose will appear in the Touchpoints list. By default, the status will be inactive, but following activation, conversations originating from these pages will appear to Agents in Conversations.
Managing Touchpoints
Tap the Connect to Facebook button, then choose Edit Settings on the popup window to add new Facebook pages or remove an existing page from the touchpoints list. Select the Meta Businesse(s) to connect and click Continue.
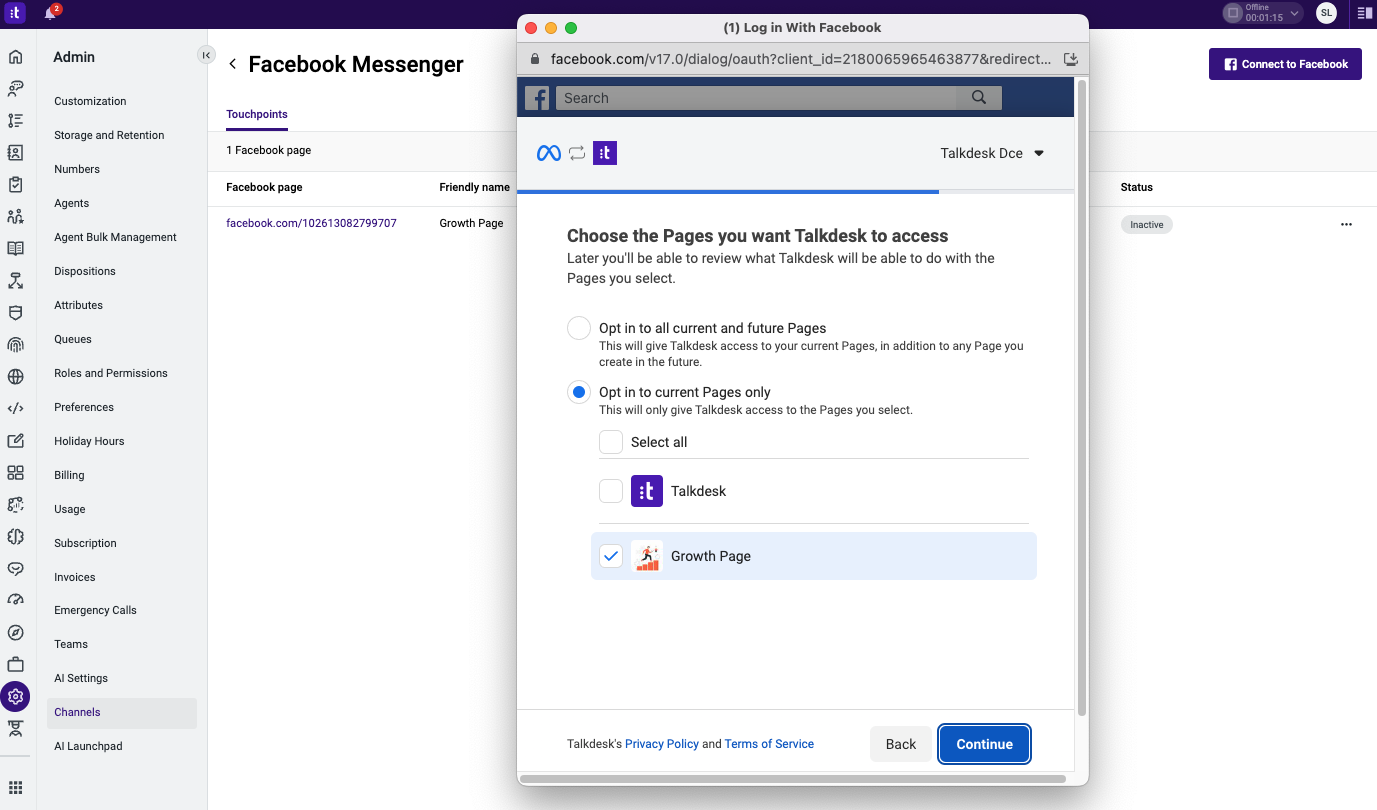
Here you can manage your Facebook pages. Select the pages you wish to add or deselect the ones you wish to remove.
Note: When you remove a page, it will remain active on your Facebook account, however, it will no longer be connected to your Talkdesk Account. This means that Agents will not receive new messages sent to the removed touchpoint on Conversations.
Editing Touchpoint Configurations
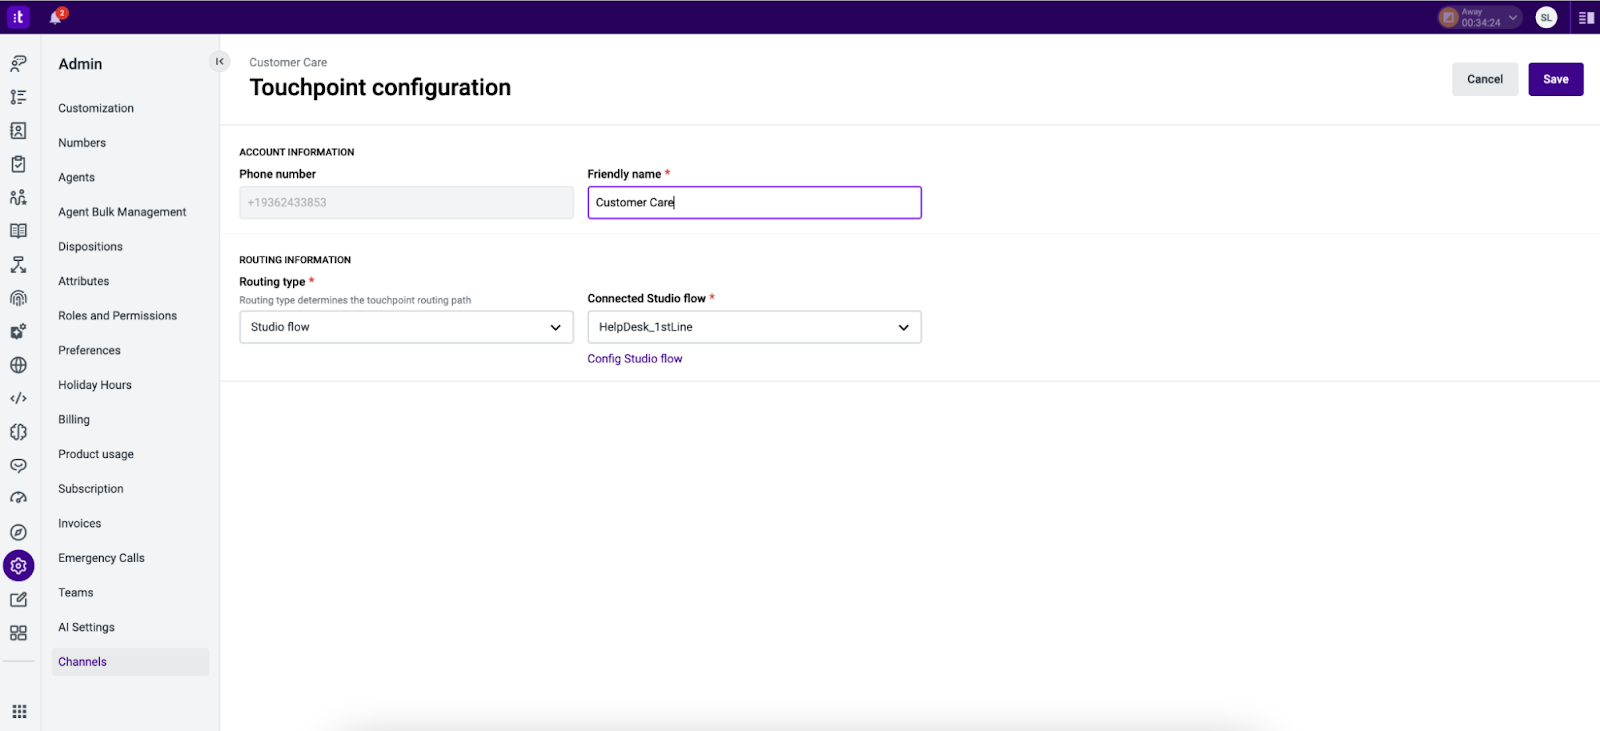
You can click the Facebook page information to access the touchpoint’s configuration settings.
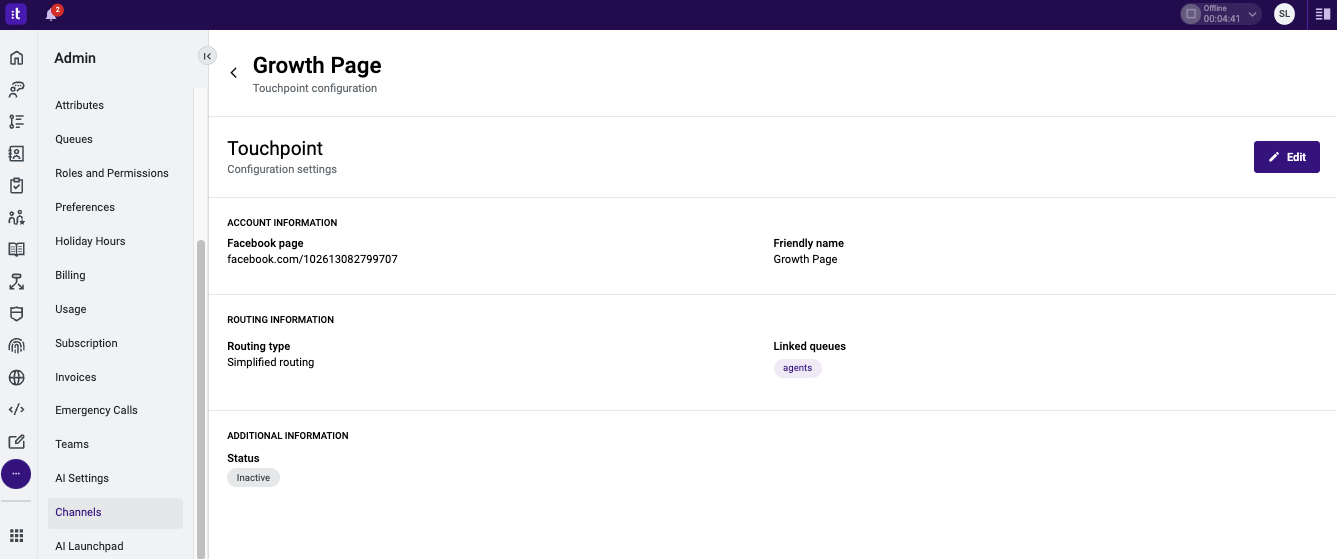
Here, you’ll find an Edit button, at the top right, which will take you to the editing screen, where you’ll be able to modify the settings.
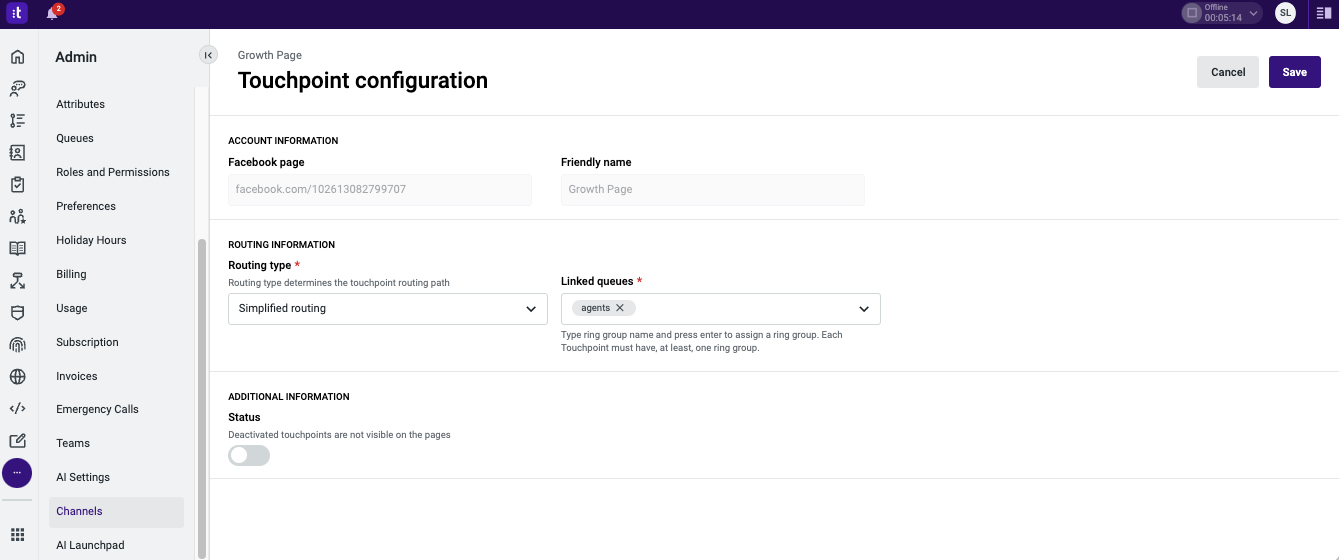
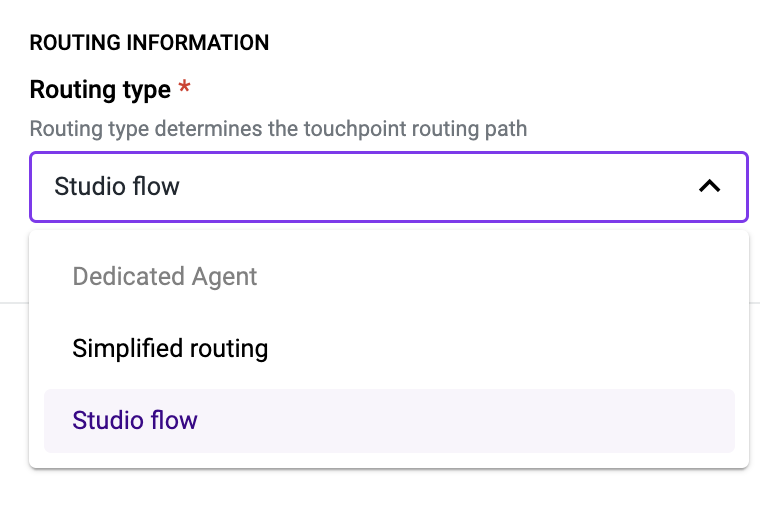
Use the “Routing type” dropdown menu to select either “Simplified Routing” or “Studio flow”.
If you chose “Simplified routing”, then select one or more queues to associate with the touchpoint.

If you chose “Studio flow”, then click the “Connected Studio flow” dropdown to find the flow you wish to associate with the touchpoint.
You can also click Config Studio flow, under the dropdown, to access the configurations of your selected flow.
Click Save to finish and apply your changes to the configurations.
Note: At this time, the following features are not available on Social Messaging channels:
- Templates
- Context (Snapshot and notes tab)
- Transfers
- Start an outbound message
Removing Facebook Connections from Talkdesk
If you want to temporarily deactivate one or more Facebook Messenger pages from being connected to Talkdesk, simply go to Admin > Channels > Facebook Messenger and click on “Deactivate”, on the dropdown menu, for each desired page.
Note: Although the page is inactive on Talkdesk, the page remains active on Meta, meaning that new conversations will not be received on Talkdesk, but will continue to be received on Facebook.
If you wish to permanently remove one, several, or all Facebook pages from Talkdesk, you will need to follow the following steps:
To disconnect one or more Facebook pages, but not all of them:
- Go to Admin > Channels > Facebook Messenger and click on Connect to Facebook.
- A pop-up screen will appear, and you will have to log in with your Facebook Admin credentials.
- Click on Edit previous settings, select the Business you want to edit, and then remove the check from the page(s) you want to disconnect from Talkdesk.
- Click Continue and Save.
To disconnect all Facebook Pages from Talkdesk:
- Go to Admin > Channels > Facebook Messenger and click on Connect to Facebook.
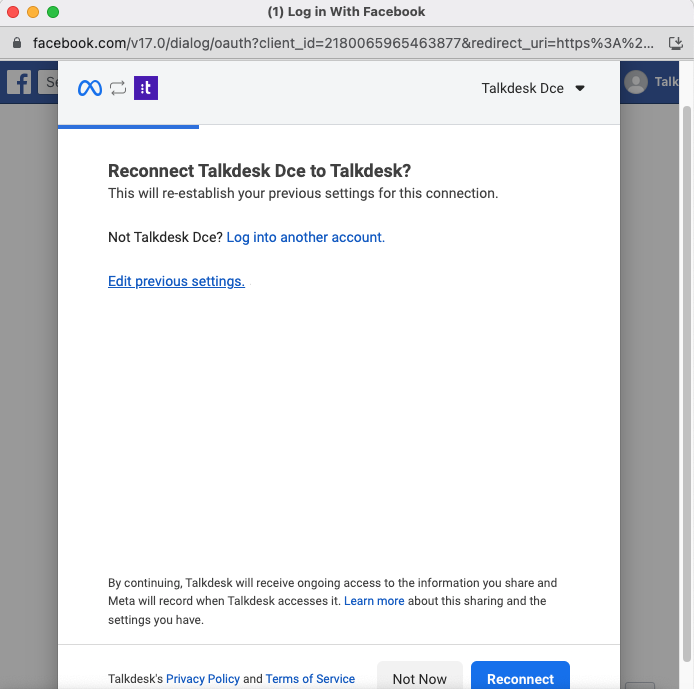
- A pop-up screen will appear, and you will have to log in with your Facebook Admin credentials.
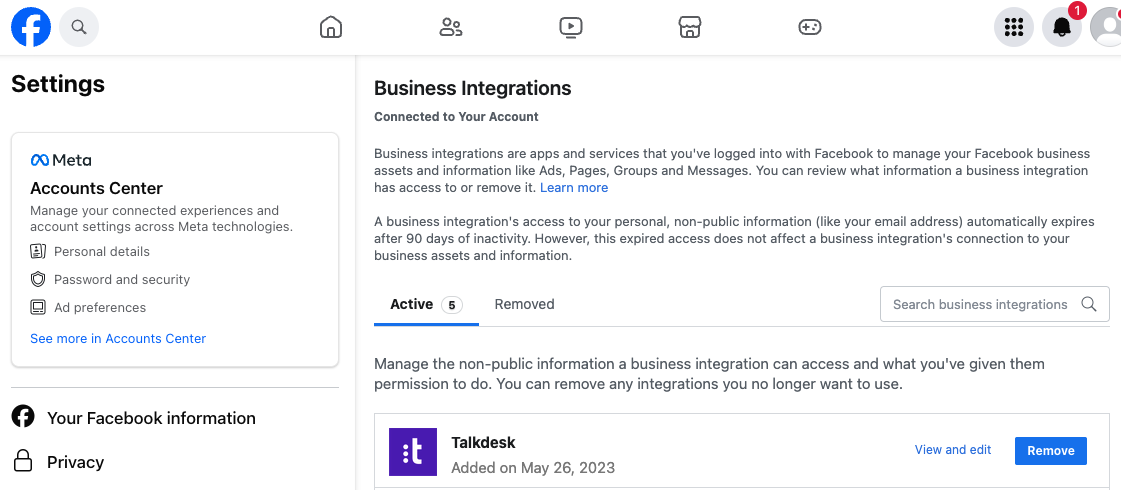
- Click Reconnect and use the hyperlink to go to Business Integrations in your Facebook account.
- In the list of Business integrations, you will see "Talkdesk" and you will have to click on Remove, at the bottom right.
5 - If you no longer want to use the Facebook Messenger channel, in addition to the steps described above for disconnecting pages, you will have to uninstall the Facebook Messenger app. The steps for Uninstalling Apps in Talkdesk Workspace can be found here.
WhatsApp Business
Existing Touchpoints
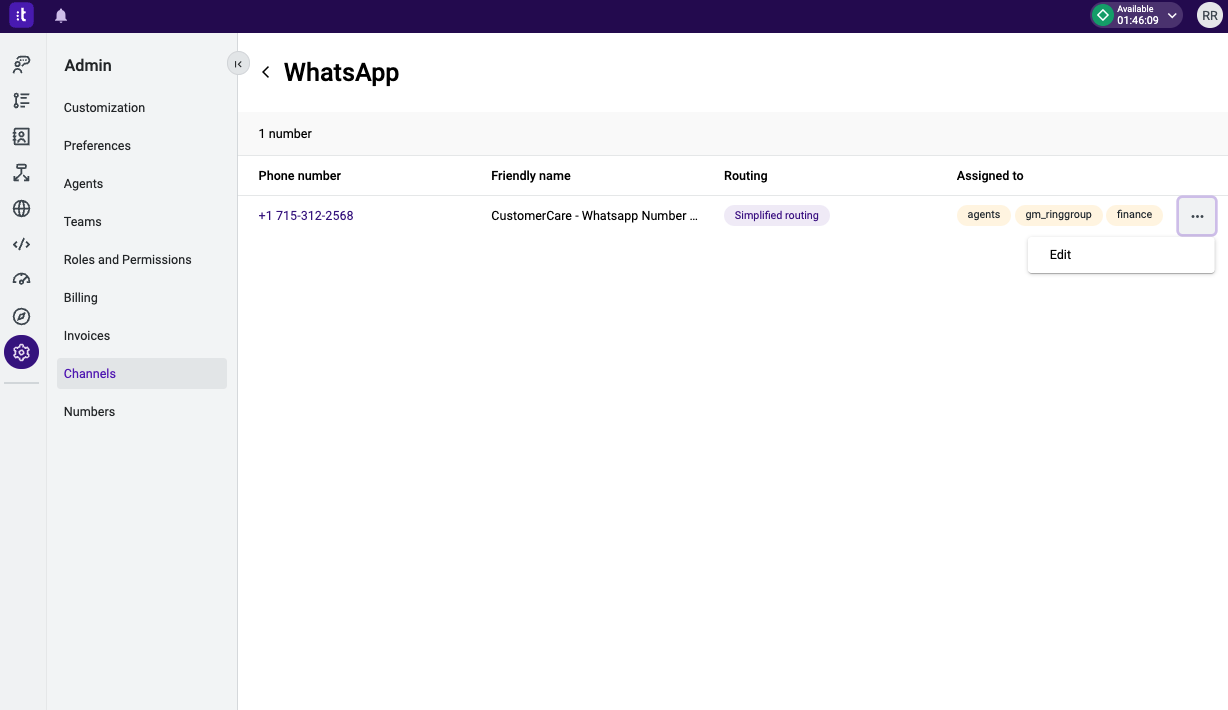
After WhatsApp and Phone Number enablement for the account, WhatsApp will be visible in the Channels tab, along with its respective number of touchpoints (phone numbers enabled for the channel). To access the Channels, first go to Admin [1] and then click on the Channels option [2].
Clicking on the “WhatsApp” section [3] will open the touchpoints’ management page.
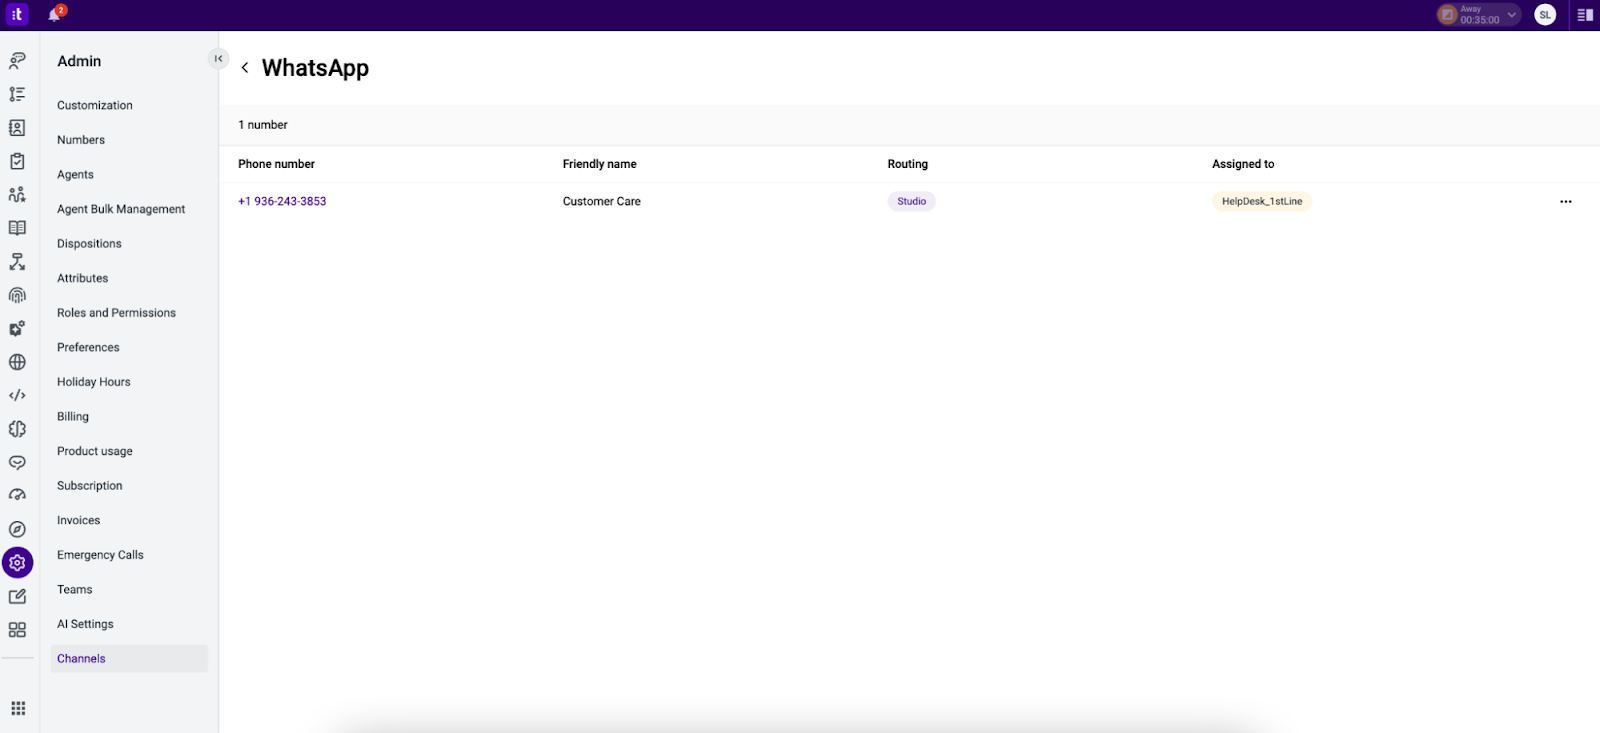
Here you will find the following columns:
- “Phone number”: List of touchpoints (phone numbers) enabled for WhatsApp channel.
- “Friendly name”: For easier identification, each phone number can be attributed to a friendly name. This name is the same one you defined in the “Numbers” screen (Admin), but here you’ll have the option to customize the name for the WhatsApp channel.
- “Routing”: “Simplified routing” or “Studio” are the routing options. This is configurable via the Edit button.
-
“Assigned to”:
- Name of the Queues associated with the touchpoint if simplified routing is selected.
- Name of the studio flow associated with the touchpoint if Studio is selected.
Note: Only agents belonging to these Queues will receive the conversations in their inbox
- “More Actions” button (“...”)”: Access to the Edit mode, where you can manage the configurations of a specific touchpoint
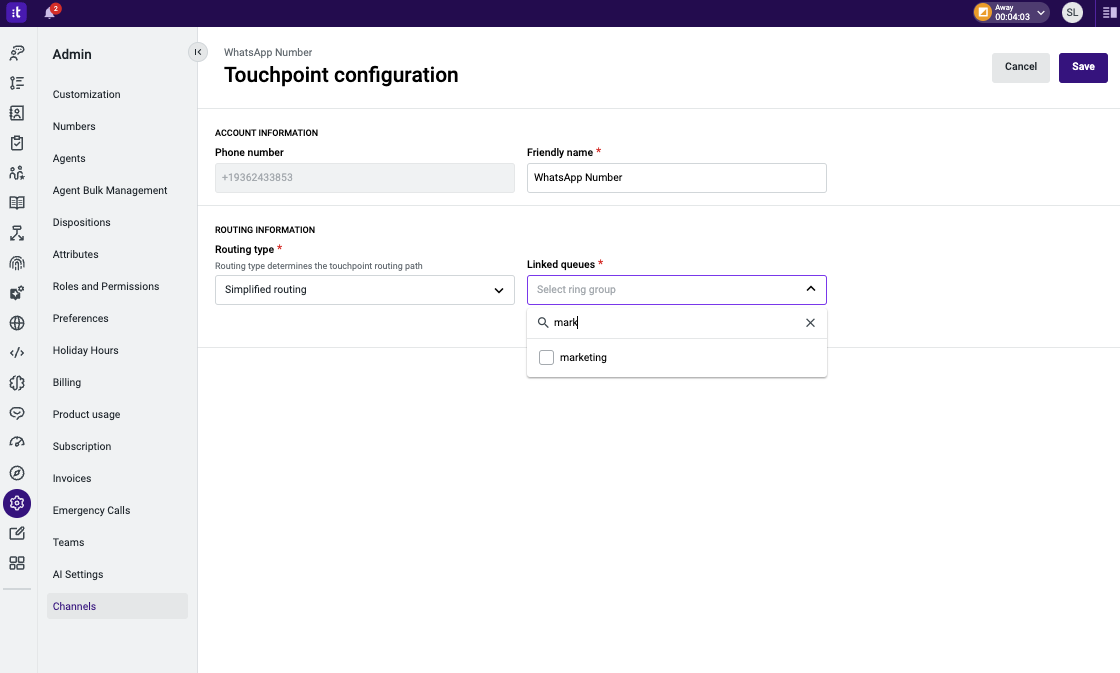
Number Configuration
From the list of touchpoints, click on a specific phone number to show the settings configured for that same touchpoint.
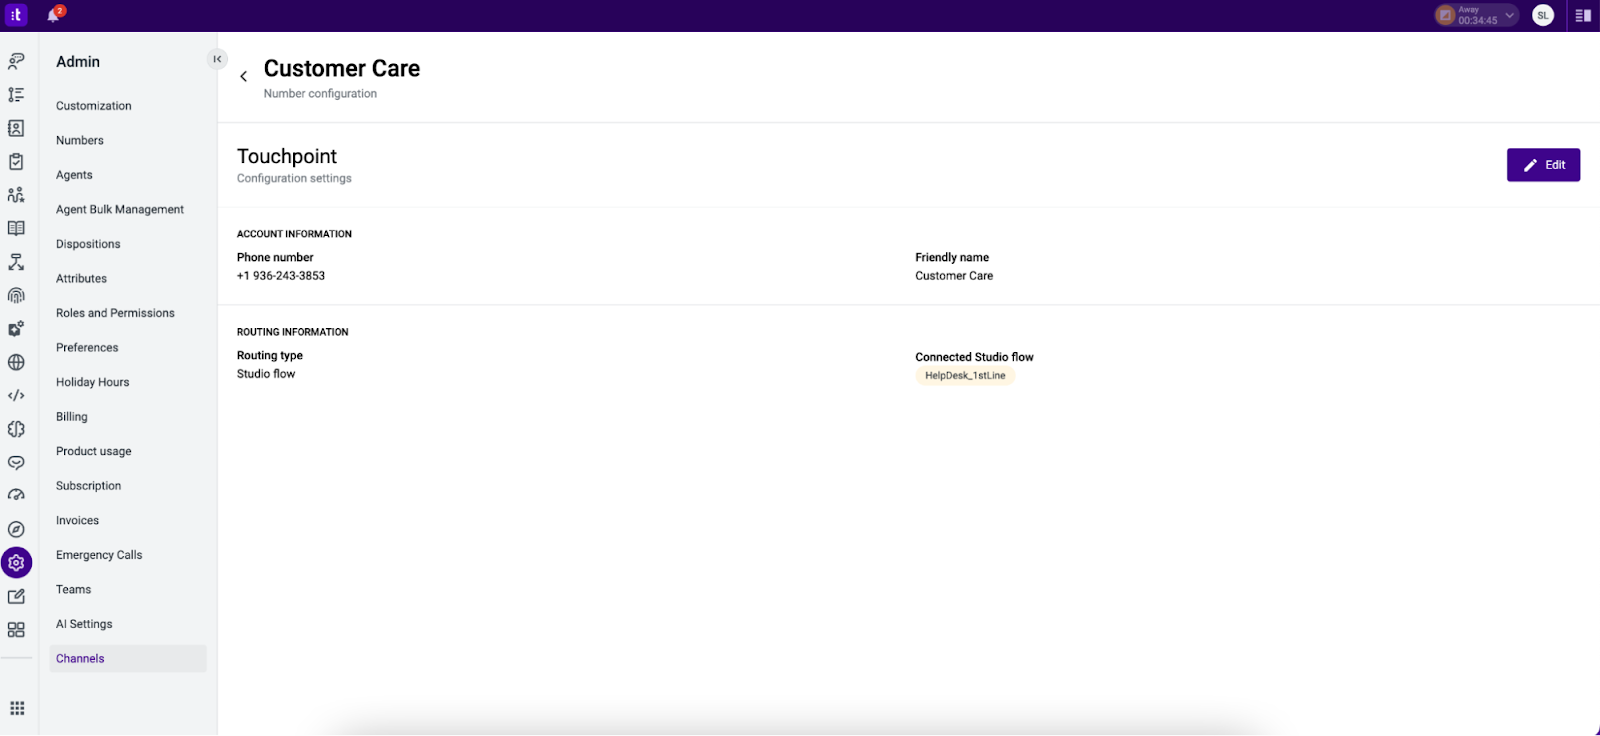
The settings page also has an Edit button, which you can use to go to the configuration editor of the selected touchpoint.
Use the “Routing type” dropdown menu to select either “Simplified Routing” or “Studio flow”.
If you chose “Simplified routing”, then select one or more queues to associate with the touchpoint.
If you chose “Studio flow”, then click the “Connected Studio flow” dropdown to find the flow you wish to associate with the touchpoint.
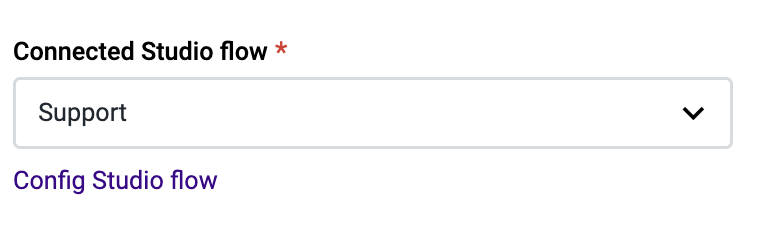
You can also click Config Studio flow to access the configurations of your selected flow.
In the "Outbound Access" section you'll find a toggle that controls outbound access by ring group. Once enabled, the admin can select from the "Select queues" dropdown which ring groups are allowed to use this touchpoint to initiate outbound conversations.
Click Save to finish and apply your changes to the configurations.
Removing WhatsApp Connections from Talkdesk
To remove one or more Talkdesk WhatsApp touchpoints and/or to uninstall the channel, please create a ticket via the Support Portal.
Registering a WhatsApp Message Template
In order to register a WhatsApp outbound template, please follow the steps outlined in this article.
- Register a WhatsApp number and onboard it to Talkdesk.
- Go to the WhatsApp touchpoint and select the “Templates” [1] tab.
- Click the Register template [2] button.
Enter the information for the template. If placeholders have been used, enter the example of the variable in the “Sample for body content” [3] area. This will help Meta evaluate the template use case, which can help increase the approval rate.
Click the Save [4] button. The template’s status will now be under review by Meta. Once it is approved, Agents will be able to use the template while sending outbound messages in the Conversations app.
Important Notes:
- If the template is rejected, please delete the template, follow Meta’s guidelines, and resubmit it.
- Templates are managed at the WhatsApp Business Account level. If a new sender is added to a business account that already has templates, those templates will apply to the new sender.
- Note that since synchronization occurs once daily, there may be a delay before customers can use these templates.
Set a Template as the Default Template
The default WhatsApp Template allows admins to set a default outbound WhatsApp template for each touchpoint, streamlining both supervisor configuration and agent workflows.
When agents send messages to contacts outside the 24-hour customer service window, Talkdesk automatically applies the configured default template, eliminating the need for agents to manually select one.
How to Set a Default Template
Go to the WhatsApp touchpoint and select the “Templates” tab.
In the templates list, hover over a template to display the star icon.
- Click the star to set the template as the default template for outbound messages sent outside the 24-hour customer service window.
- Only templates in approved and active status can be set as the default template. (In Meta terminology, an approved template becomes Active — for example, “Active – Quality pending”.)
- To unset a default template, click the star again.
If a template is deactivated or deleted, it is automatically removed from the default configuration. The Admin can then select another default template.
Note: If the conversation is active within the 24-hour customer service window, the default template will not be automatically applied in the Conversations app.
Understand the Templates' Status
Template Quality Rating
The quality rating of a template shows how messages from the template have been received by customers in a rolling window of the past 24 hours.
Template Status
The status shown in the templates list is synced from Meta. For details on what each template status means (for example, review outcomes, Active vs. Paused/Disabled, and how quality can impact status), refer to Meta Guidance.