

Overview
Important Note: Available in Preview for all customers via opt-in toggle in Studio Editor.
The Studio Editor revamped experience marks a new experience for Talkdesk Studio™. The Studio Editor focuses on a tailored approach with the first phase targeting the node experience, optimized toolbar positioning, a new exit management system, and an interactive minimap to improve flow navigation.
Table of Contents
- Navigating the Editor
- Nodes and Exits
- Navigating the Flow Canvas
- Flow Validation Panel
- Manually Positioning Components
- Copy & Paste in Studio Editor
-
Context Manager
Navigating the Editor
The redesigned editor can be enabled or disabled at any time using the Preview toggle located in the bottom-right corner of Studio Canvas.
The editor provides a layout to maximize the workspace canvas. Key changes include the relocation of the search and Manage Context tools to a toolbar in the bottom-left corner. Additionally, the rendering of nodes, connections, and exits has been redesigned for better clarity and usability.
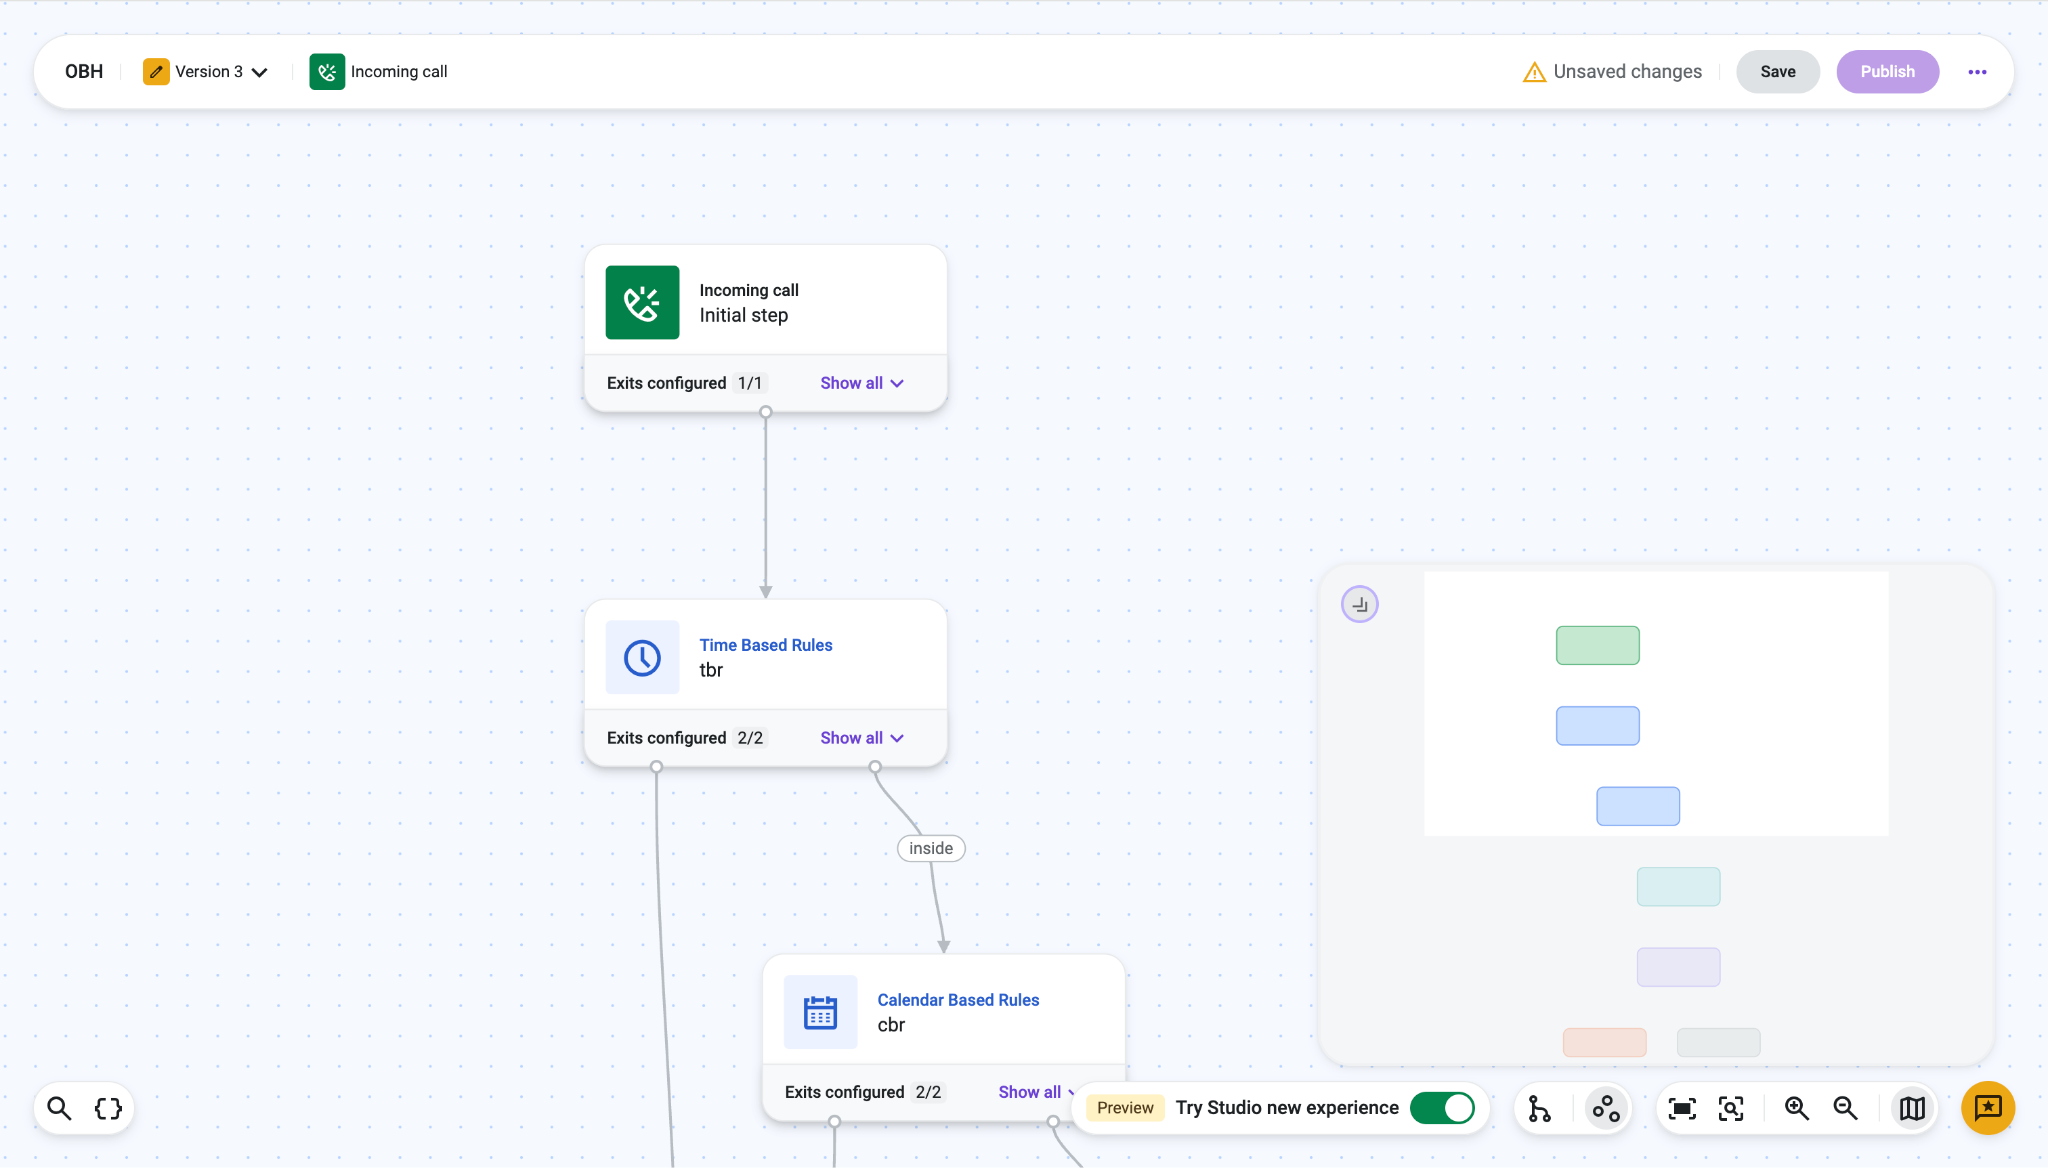
Nodes and Exits
Nodes offer an interactive and collapsible experience within the canvas:
- Node Information: Each card displays the component type and the specific node name.
- Collapsible Exits: It is possible to choose to show or hide configured exits directly on the node to declutter the canvas.
- Go To Capability: When clicking Show all [1], exits appear highlighted. Clicking Go to [2] allows jumping directly to the connected node in the flow.
Adding New Nodes
Builders add a new node to a flow in three ways: from the bottom toolbar, from an existing node, or from an exit. The toolbar and existing-node methods work independently of exits, so builders can lay out several nodes before connecting them.
Adding a Node from the Toolbar
The toolbar method supports adding several nodes at once, without connecting them right away. This suits builders who prefer to lay out a flow before wiring the steps together.
To add a node from the toolbar, follow these steps:
- Click the + button on the bottom toolbar [1].
- In the side panel, browse or search for a node [2].
- Click a node to add it to the canvas. Repeat this step to add more nodes before connecting them.
Each added node is placed automatically in the visible canvas area.
Adding a Node from an Existing Node
This method connects a new step directly to a node that is already on the canvas.
To add a node from an existing node, follow these steps:
- Select the node to connect from.
- Click Connect to node [1].
- In the picker, select one of the most recently used nodes (up to three are shown, with the option to scroll for more), or click Add new node to open the full node list.
- Select the node to add.
The newly connected node is highlighted on the canvas.
Adding a Node from an Exit
This method follows the existing flow-building behavior.
To add a node from an exit, follow these steps:
- Select an exit point on a node [1].
- Click on the Exits tab [2].
- Select a node from the list, or add a new one [3].
Navigating the Flow Canvas
Several tools are available to help navigate complex flows:
- Minimap [3]: Located in the bottom-right corner, the minimap provides a high-level view of the entire flow and can be expanded for easier navigation.
- Zoom Controls [4]: Zoom in or out of the canvas.
- Navigation Toolbar [5]: Use the Fit to screen and Reset zoom buttons to quickly adjust the view of the canvas.
Flow Validation Panel
Errors
Flow validation errors will appear in a side panel instead of a message overlay, as shown in the image below. Errors need to be resolved before a flow is published.
Clicking Edit navigates directly to the corresponding node where the issue can be addressed.
Warnings
Following the same structure approach as errors, Talkdesk Studio also includes warnings: Even though users may have some inconsistencies across the flow, it’s not a hard stop for having it published.
Studio has warnings for:
- Invalid Arguments.
- Reference content without the specific format.
- Invalid Conditions.
- Uninitialized variables in modules.
- Invalid Functions.
Updates
As Talkdesk Studio evolves, we occasionally launch updates to the components. These updates include new features or improvements to the overall usability.
Major updates are not applied automatically to avoid disrupting the flow: A message is displayed within the component to let you know that an upgrade is available
To apply the update for a single node, click on the node or click on the “Update to…”
It is also possible to choose to bulk update for a faster update experience.
Manually Positioning Components
Studio supports two options for the layout of nodes in canvas: Automatic or Manual Layout. With this feature, Studio builders can manually reposition components on the canvas instead of relying solely on the automatic layout, preventing automatic layout changes from abruptly rearranging a flow.
Automatic vs. Manual Layout
Builders can toggle between:
- Automatic Layout: The system arranges components automatically. This remains the default state for all flows.
- Manual Layout: Builders can freely drag components around the canvas, with node collision detection active to prevent overlapping.
The first time a builder switches to Manual Layout, the canvas adopts the current automatic positions as a starting point. From there, the builder is free to rearrange components as needed.
Switching Back to Automatic Layout
If a builder switches from Manual back to Automatic Layout, a confirmation dialog warns that the manual positioning will be lost and that this action cannot be undone. If the builder later switches back to Manual Layout, positioning will need to be redone. The dialog can be dismissed.
Persistence and Permissions
- Consistent across users: The selected layout (and manual positioning, if applicable) is stored within the flow itself, so the canvas looks the same for every user who opens it and not just the person who arranged it.
- Layout history: If a builder moves from Manual back to Automatic and then to Manual again, the previous manual layout is not retained and must be reconfigured. This means that manual positions aren't stored while a flow is in Automatic Layout.
- Roles & Permissions: The Manage flows permission controls access to this capability.
- Node highlighting: A pop-up highlights the currently selected node while in Manual Layout.
Copy & Paste in Studio Editor
Copy & Paste brings native copy and paste capabilities to Talkdesk Studio™, allowing Admins to copy configured nodes and paste them with all internal settings and resources intact.
This feature works within the same flow, across different flows, and between separate accounts. Admins can perform these actions using keyboard shortcuts (⌘/Ctrl+C, ⌘/Ctrl+V), toolbar icons, or the node's contextual menu.
By eliminating the need to manually re-enter multiple fields to replicate logic, Copy & Paste streamlines flow creation and reduces errors.
Copying Nodes
To copy nodes, follow these instructions:
- Open a flow in the Studio Editor.
- Select the node or nodes to copy:
- To select one node, click it.
- To select multiple nodes, click the Multi-select button [1]. When multi-select mode is enabled, multiple nodes can be selected by dragging or by holding “shift” while clicking individual nodes. The wanted nodes to copy should be fully selected in order to be picked up.
- Copy the selection (or a single node) using one of the following methods:
- Keyboard shortcut: Press Cmd+C (Mac) or Ctrl+C (Windows).
- Toolbar: Click the Copy icon [2] in the editor toolbar.
- Node menu: Click the node to open its contextual menu, then select Copy [3].
Note: A copied selection replaces whatever was previously on the clipboard. The clipboard holds only the most recent copy and does not persist across browser tabs or sessions.
Pasting Nodes
To paste nodes, follow these instructions:
- Navigate to the destination canvas: The same flow, a different flow, or a different account.
- Paste the copied selection using one of the following methods:
- Keyboard shortcut: Press Cmd+V (Mac) or Ctrl+V (Windows).
- Toolbar: Click the Paste icon [4].
- Confirm the pasted node or nodes on the canvas. When copying nodes within the same flow, all inputs, variable mappings, settings, and referenced resources are carried over to the copied nodes. When copying nodes between different accounts or flows, some resources may need to be reconfigured or reassigned. When multiple nodes are pasted, their arrangement and positions are preserved as a group.
Note: When the clipboard holds nothing pasteable, the Paste icon is disabled, and the keyboard shortcut performs no action.
Copying and Pasting Across Flows and Accounts
- Same flow: The pasted node is an identical copy of the source, including all inputs, variable mappings, settings, and referenced resources.
- Different flow, same account: The pasted node keeps its configuration. If a mapped variable does not exist on the destination flow, it needs to be created.
- Different account: Single or multiple nodes can be pasted into a different account. If a node is connected to another node, the connection carries over to the destination flow. Resources that do not exist on the destination account require mapping, similar to export and import.
- If a node’s requirements are invalid for the destination (for example, a voice node pasted into a digital flow), or the node is unavailable in the destination flow, the paste node will be shown as not available.
Handling Naming Conflicts and Paste Errors
- If a pasted node’s name collides with an existing node in the destination, Studio renames the pasted copy automatically.
- If a paste cannot complete, a non-blocking message names the affected node, and the destination flow remains unchanged.
Context Manager
The Context Manager replaces the previous "Manage Context" side panel with a modal, giving builders a single place to view, filter, and manage all context variables in a flow.
Note: Changes made in the Context Manager are only applied after clicking Save.
To open the Context Manager, builders click the Manage Variables icon in the bottom-left corner of the editor toolbar.
The modal displays the following columns for each variable:
- Variable Name: The variable's name and display name.
- Type: The variable's data type - string, boolean, number, or integer.
- Format: How the variable's value is presented - "Auto-open," "Clickable," or "Text."
- Expose Context: Where the variable is exposed
- Security: The variable's redaction and retention settings.
- Usage: Whether the variable is in use, and which nodes write to or read from it.
- Initial Content: The variable's default value, if one is set.
Creating a Variable within Context Manager
- Click Add Variable [1].
- Enter a variable name and select a type [2].
- Enter a display name [3].
- Optionally, enter initial content, including static values or dynamic values selected from the list [4].
- Click Add Variable [5] to save.
Filtering Variables
- Click the Filter icon [1].
- Select one or more criteria: Type, Expose Context, Format, Redacted, Default Retention Period, Usage, or Initial Content [2].
- Click Apply Filters [3].
Reordering Variables
Builders can drag variables to reorder them in the list. Reordering matters because context variables are read back in the order shown (for example, in Conversations).
Deleting a Variable
Builders with the required permissions can click the delete icon next to a variable to remove it. Only variables without usage can be deleted. The same will apply to edit variables, where type is only available if the variable is not in use.
Initial Content
Users can set initial content for a context variable, allowing it to have a default value that will then be overwritten when written in the flow.