Once you have configured a relevant Connection and Action, you can use them to set up an inbound flow that contains an “Execute Action” component to perform the patient look-up, and another “Execute Action” component to perform the contact sync with Epic. This will retrieve the patients’ information and sync it with Talkdesk, so that when the call is assigned, the agent can view the patient’s medical records along with all relevant information, on the Patient 360 app in Workspace.
Configure this inbound Studio flow as described below:
1. Open the Incoming Call component and select the Preferences tab.
2. Click on the drop-down next to “source_phone” and then on “Create variable”.
3. Give a name to the variable. It will store the phone number that reached your contact center.
4. Repeat the process for the “interaction_id” field.
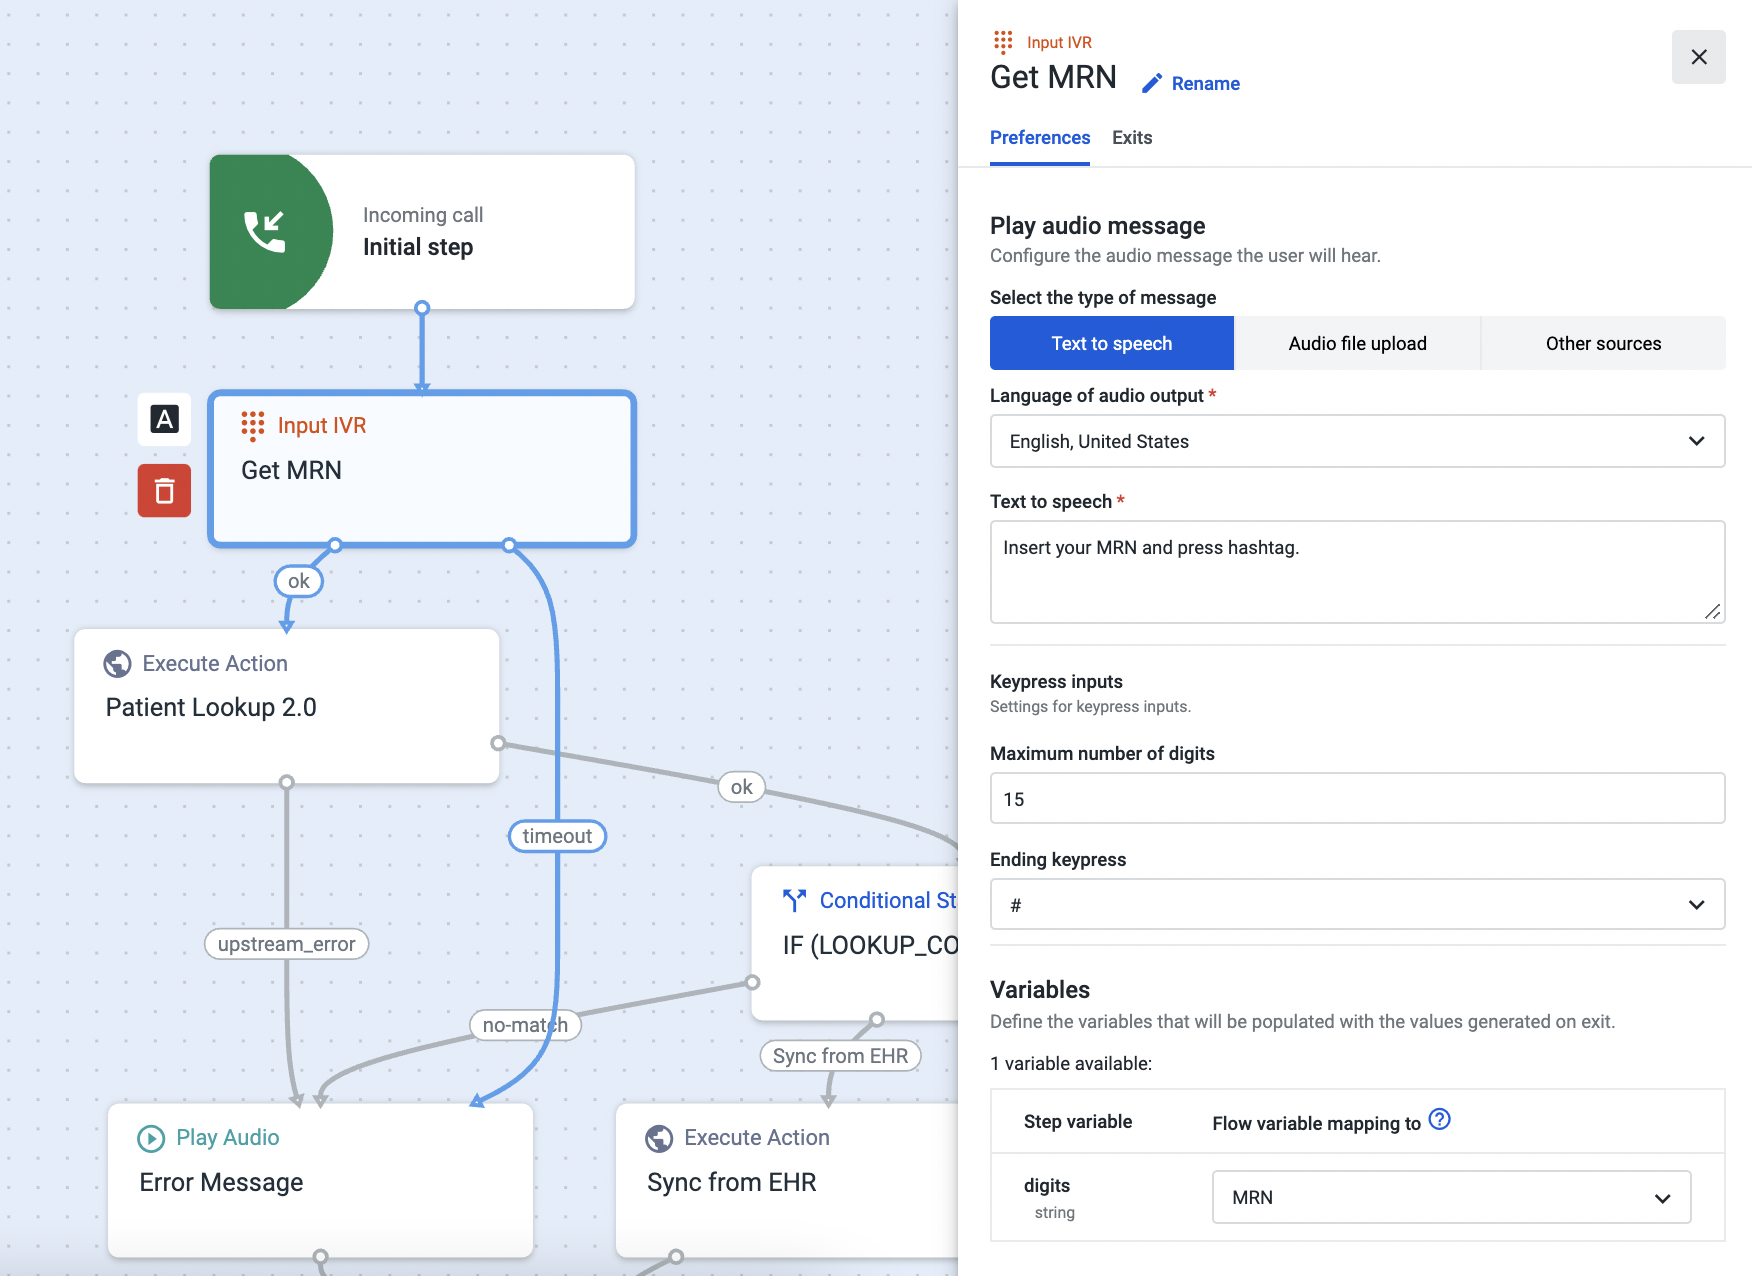
5. Go to the Exits tab and define a step to direct the call. In our example, we have decided to add the Input IVR component, with which we will be asking patients to provide their Medical Record Number (MRN). You can also use it to ask your patients to input their date of birth or phone number, for example.
6. Fill in the “Keypress inputs” section with the maximum number of digits the caller can insert through the dial pad, and an ending keypress, if necessary.
7. Define the variable that will store the value the caller inserts through the dial pad, and that you can use further in the flow.
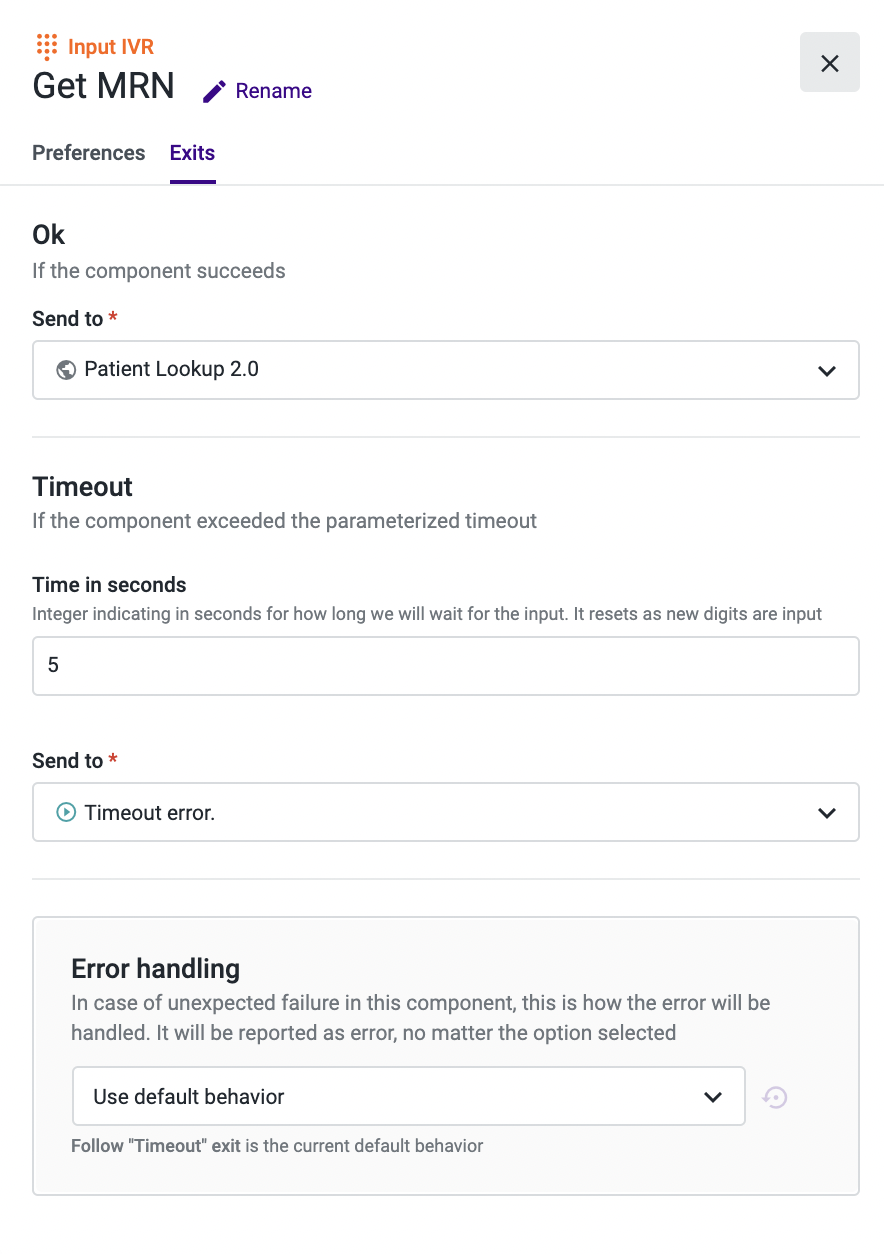
8. Go to the Exits tab and under “Ok”, add the “Execute Action” component, which will allow making a data dip using the custom integration and action that we previously created.
9. Under "Time in seconds", type the number of seconds the system will wait for the caller to select an option and an exit to which the call will be directed in case of timeout.
10. Configure the behavior of scenarios in which unexpected component failure occurs in the “Error handling” section. This section will be present in every component. For more information, please visit the relevant documentation.
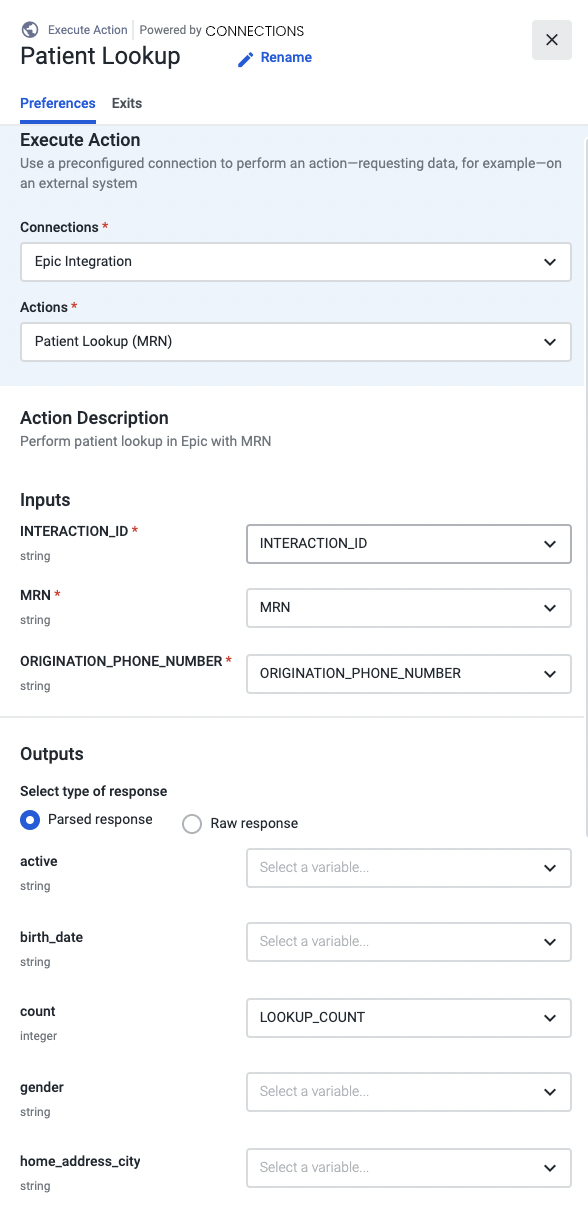
11. Go to the Execute Action component, which we’ve named “Patient Lookup”, and open the Preferences tab. This component is used to perform the patient lookup in Epic.
12. Select the connection and action that you have previously configured.
13. Fill in the “Inputs” fields with the variables that represent the data to be sent to the API.
14. Under “Outputs”, enter the variables that will retrieve the intended results.
15. Go to the Exits tab and add a Conditional Statement under the “OK” exit. We’ve named ours “If (Lookup_Count > 0)”.
16. Fill in the “Execution Error” exit. In our example, we’ve added a Play Audio component named “Error Message” that will inform patients that their medical records could not be located.
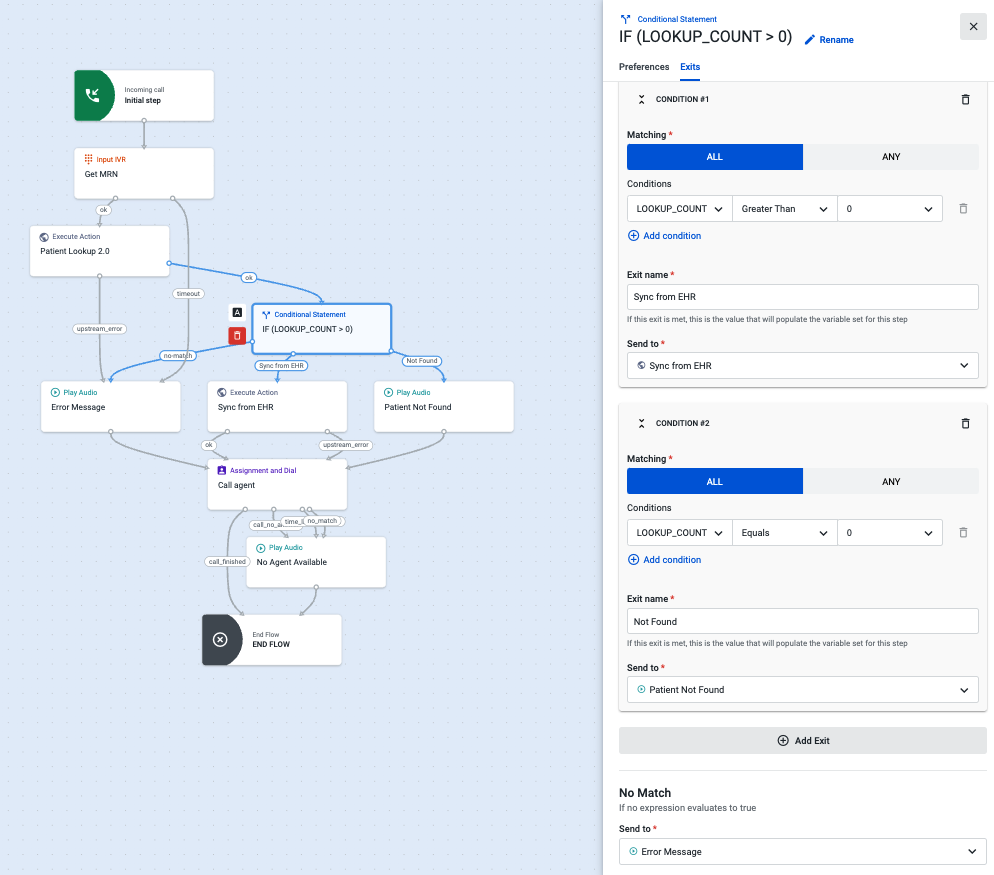
17. Open the Conditional Statement component. With this conditional statement, we intend to evaluate the synchronization with the Electronic Health Record (EHR), depending on the value received through the “Patient Lookup” step used before. Use one of the buttons, All or Any, and the drop-downs to create the following conditions in the Exits tab:
-
- Lookup Count/ Greater Than/ 0
- Lookup Count /Equals/ 0
In case the lookup value is greater than zero, we will proceed with the sync. As such, we will add a new Execute Action component to Condition 1 and name it “Sync from EHR”. In our example, we have decided to add a Play Audio component which we’ve named “Patient Not Found”, to inform patients that the medical records have not been found, in case the lookup count value corresponds to 0.
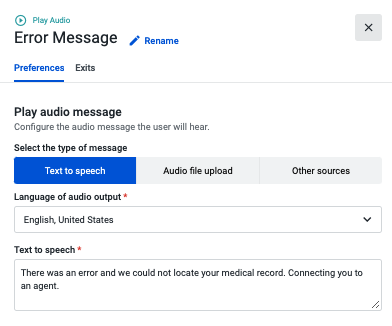
18. Configure both Play Audio components (“Error Message” and “Patient Not Found”) with the required audio messages that will be played to the patients. We also want to give patients the chance to speak with an agent in case an error occurs during the retrieval of the records, or in case the medical records could not be found. As such, we will add an Assignment and Dial component named “Call Agent” to the Exits tab of both components.
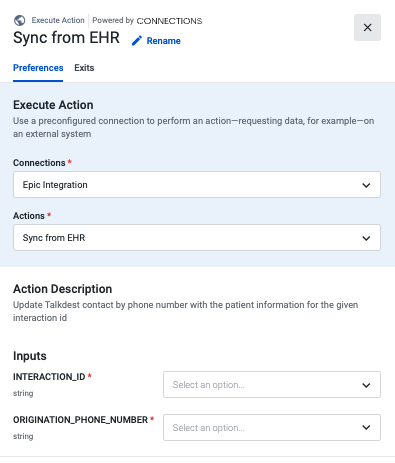
19. Back to the “Sync with EHR” step, open the Preferences tab to configure this new “Execute Action” component. It is used to sync the contact information from Epic to Talkdesk. This means that when a patient is found in Epic, their contact details are imported to Talkdesk before the agent picks up the call.
20. Select the relevant connection and action and the inputs which will be used to send the data.
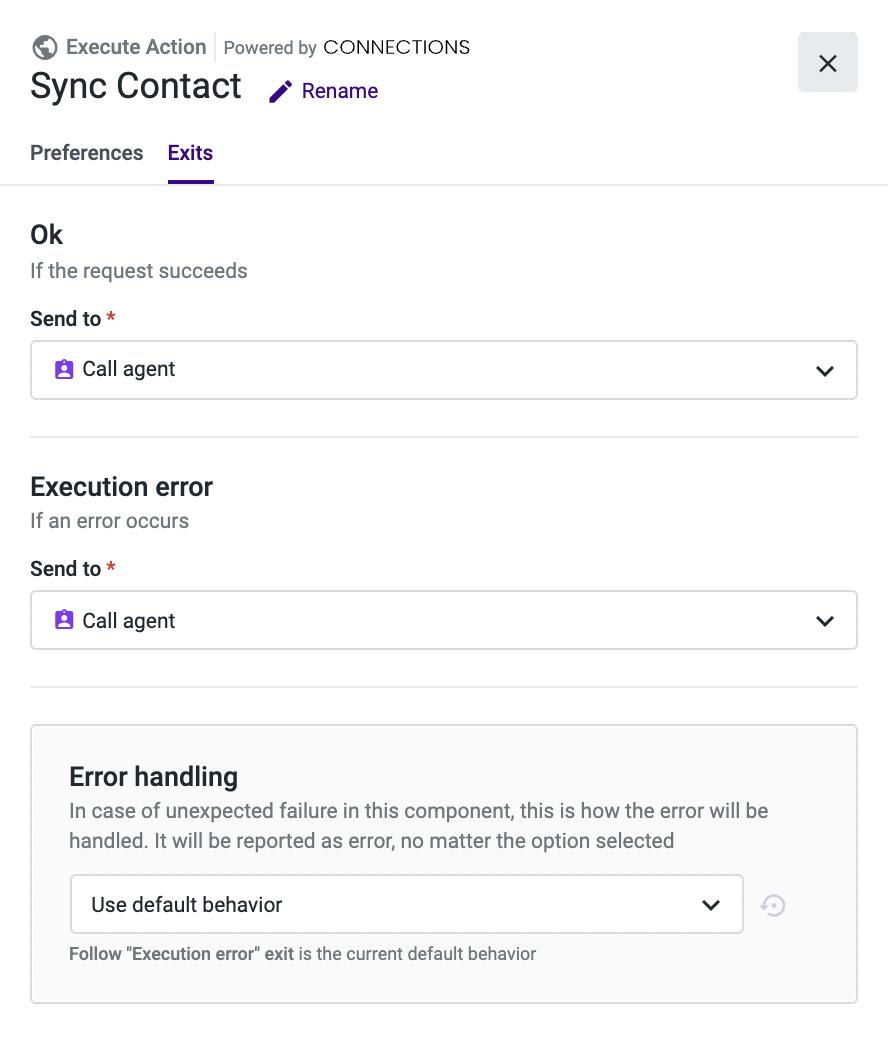
21. Open the Exits tab and configure the “Ok” and “Execution error” exits. In our example, we have configured them to allow patients to speak to an agent whether the patient is successfully found and synced with Talkdesk or not. If successful, the call is assigned to the agent, who will have the patient’s EHR information on the Patient 360 app. To allow that, we have added an Assignment and Dial component named “Call agent” to both exits.
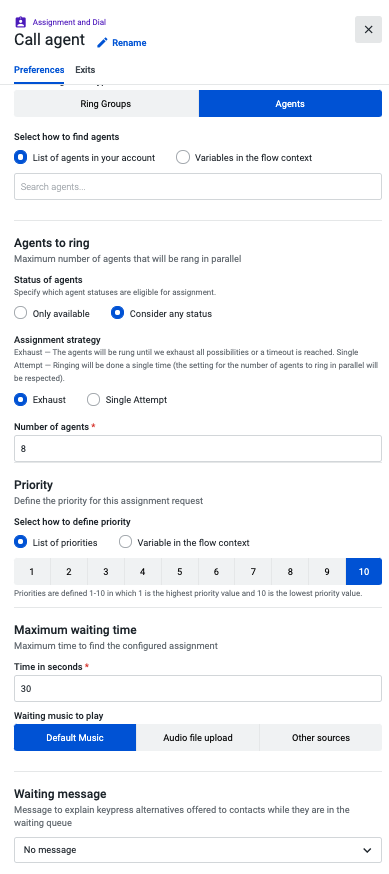
22. Configure the Assignment and Dial component according to your preferences. As for the Exits, in our example, we have decided to end the flow after the patient speaks to the agent.
23. When finished, remember to save and publish your flow.